Autofill guide
This guide demonstrates how you can generate dynamic designs in Canva using brand templates, autofill, and the Connect APIs.
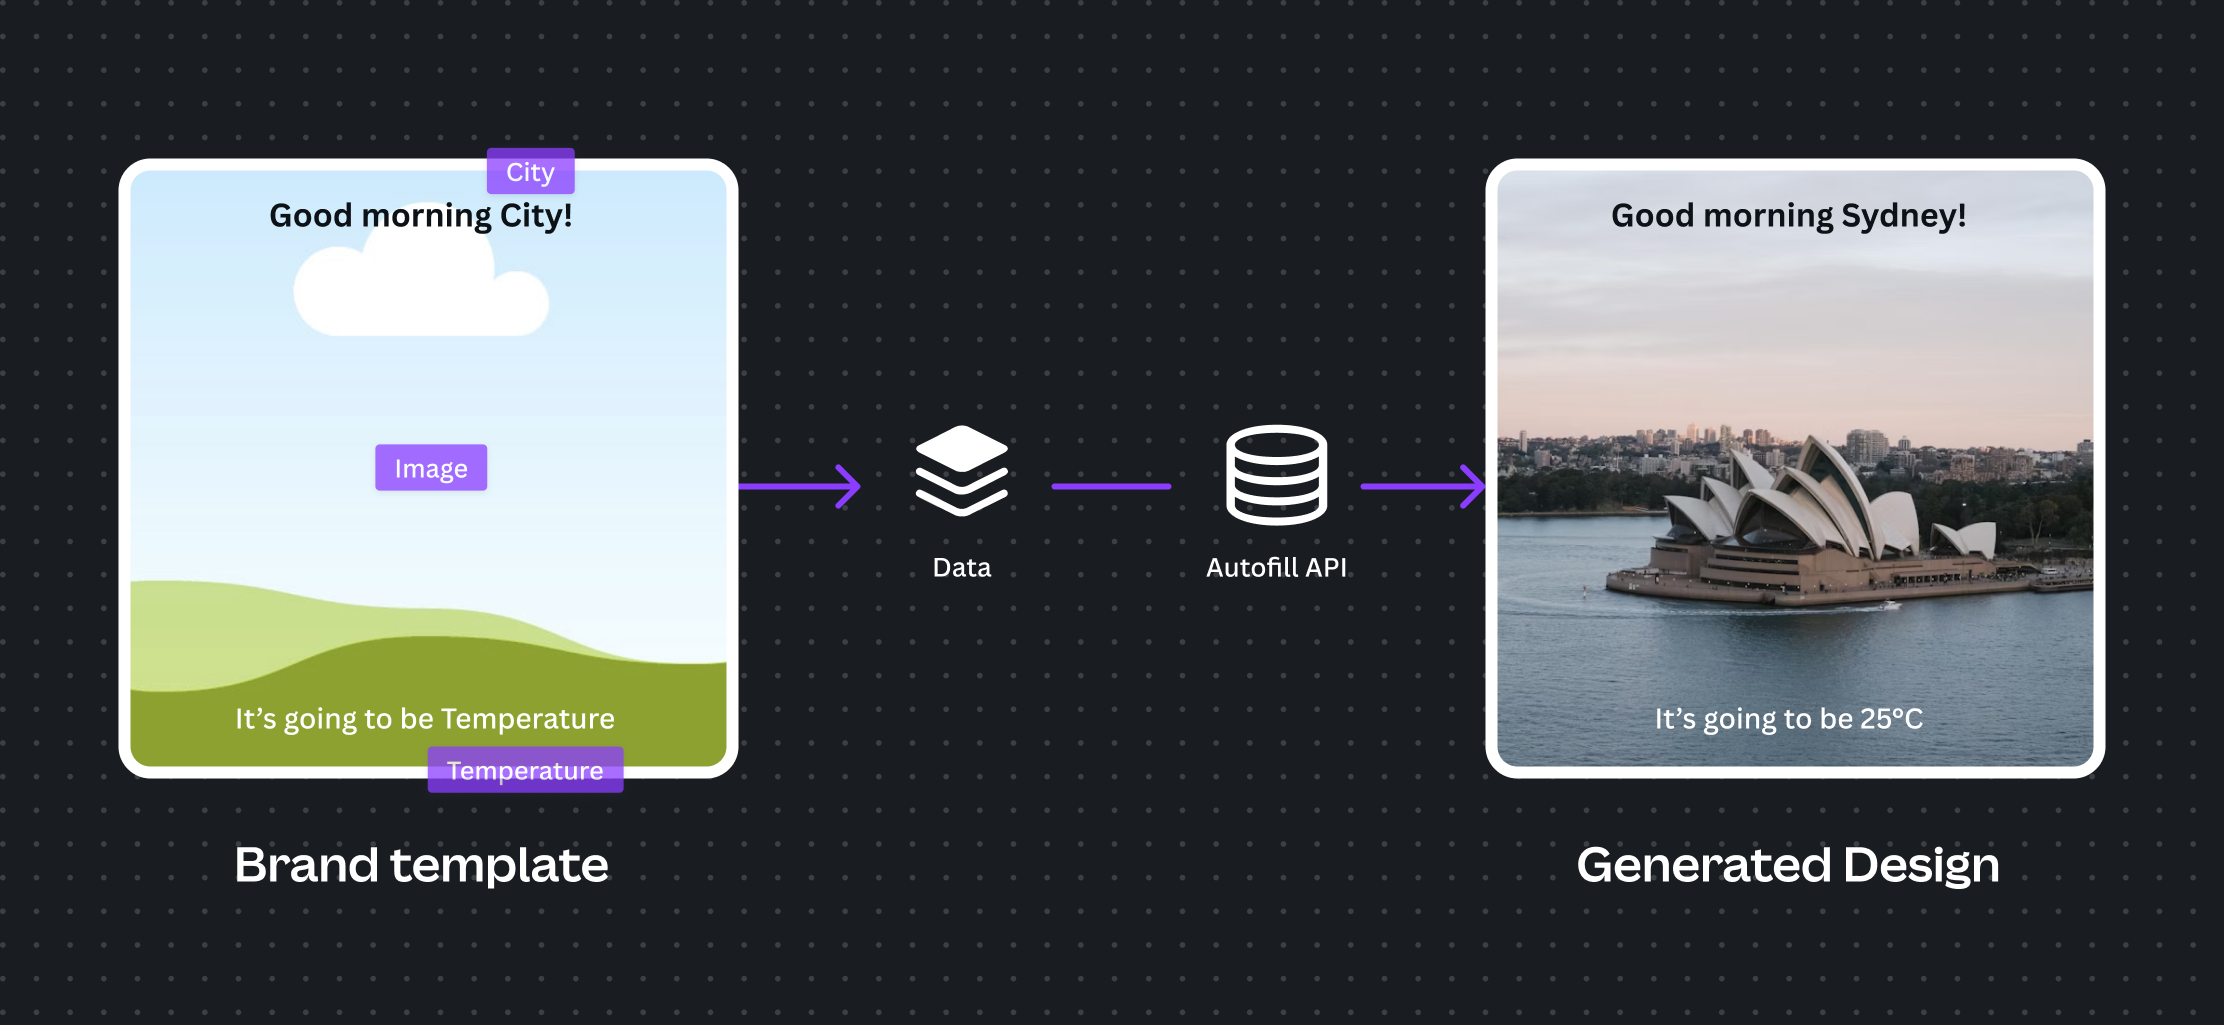
The following example generates a design based on variables from a custom data source. A city name and weather information from a dataset is sent to the API in a request, and then the supplied information is applied to a template to create a new design.
To use the Brand template and Autofill APIs, your integration must act on behalf of a user that's a member of a Canva Enterprise(opens in a new tab or window) organization.
Prerequisites
To complete this guide, you need:
- An account on https://www.canva.com/developers(opens in a new tab or window).
- A Canva Developer integration with the required permissions (also known as scopes).
- Access to the autofill and brand templates features in Canva (requires an Enterprise subscription).
If you don't have a Canva Enterprise subscription, but have a genuine development use case, you can request access to these features when setting up your integration in the Canva Developer Portal. To apply, you must explain which data source you want to connect to Canva. Requests are typically processed within a few days, and if approved, your access is granted for development purposes only. Any user of your integration must have a Canva Enterprise subscription.
Create an autofillable template
The following steps walk you through creating a design template, configuring the Data autofill app, and publishing your design as a brand template.
Step 1. Create the template design
-
Log in to your Canva account with an account that has access to the autofill and brand templates features.
-
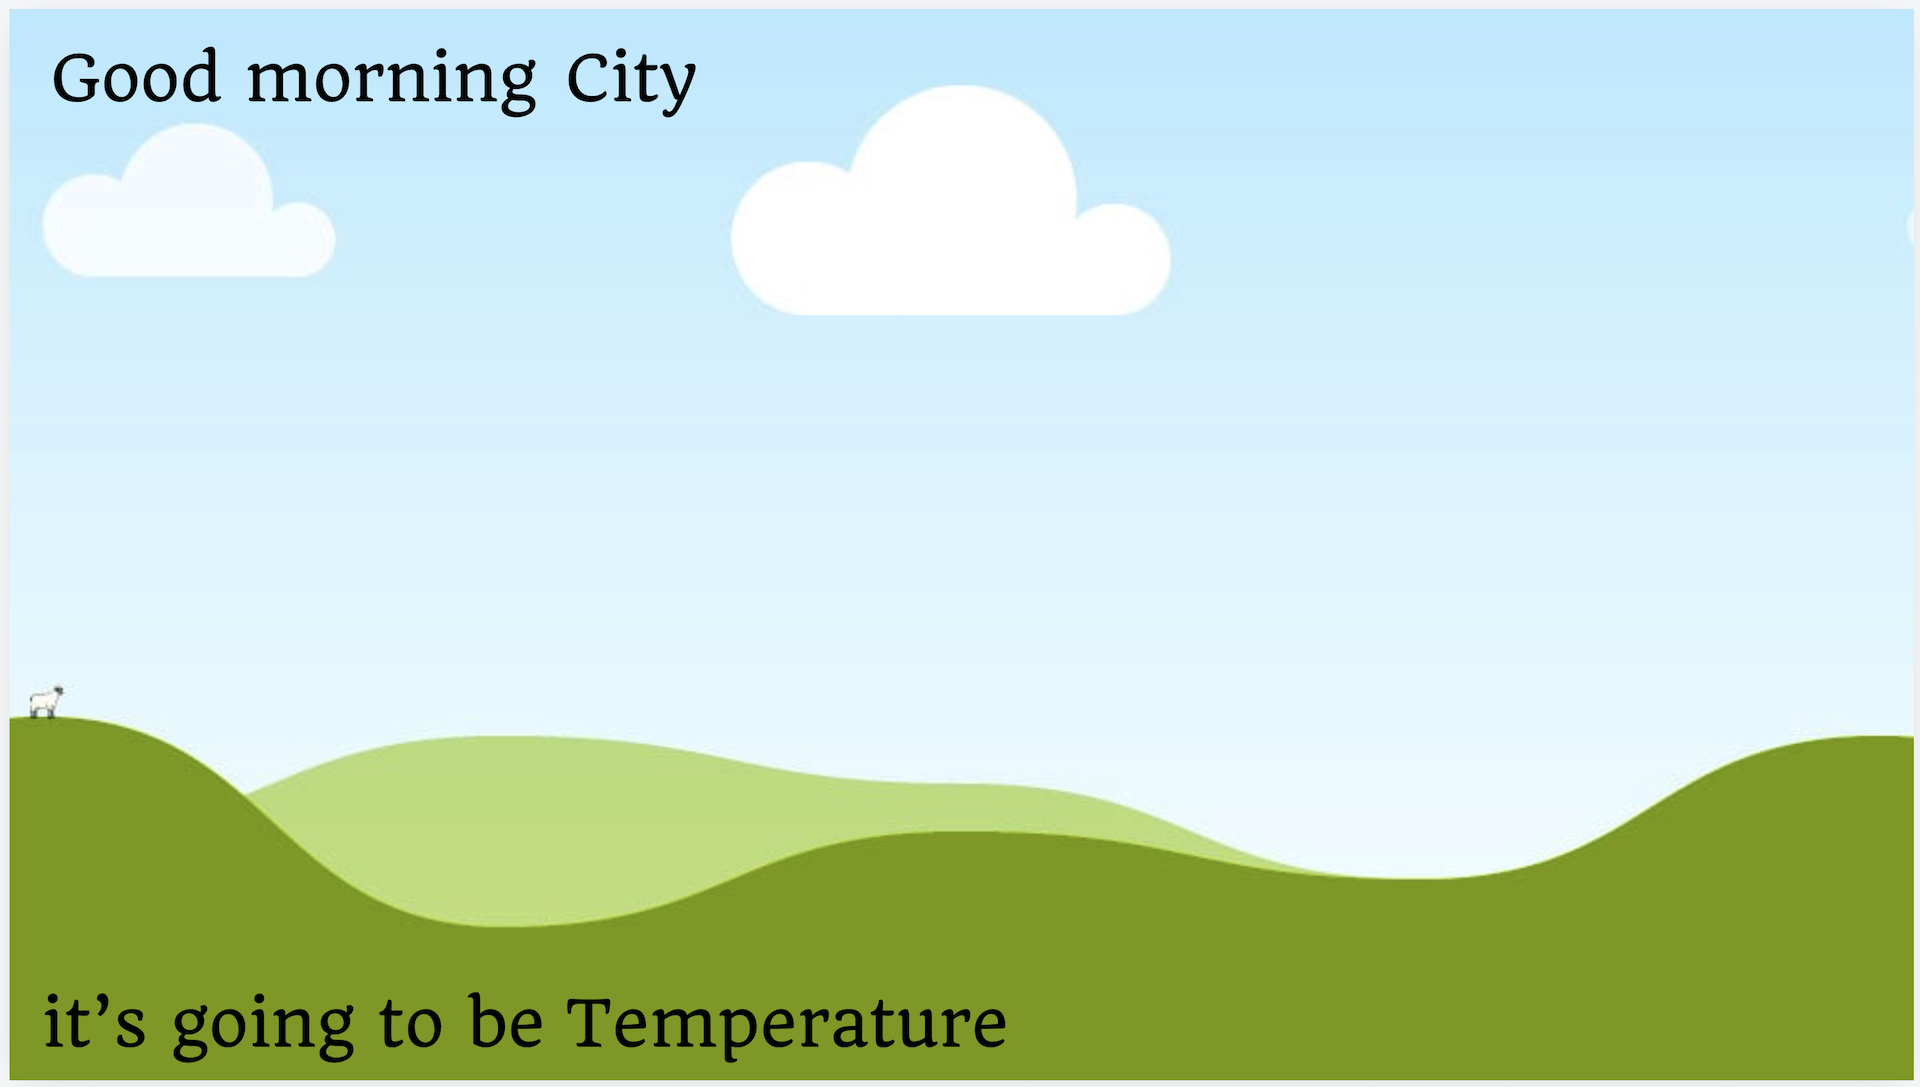
Create a Presentation (16:9) design with two text blocks at the top of the canvas:
- In the first block, add the text:
Good Morning. - In the second block, add the text:
City.
- In the first block, add the text:
-
Add two more text blocks to the bottom of the canvas:
- In the first block, add the text:
It's going to be. - In the second block, add the text:
Temperature. You can style the text however you want.
- In the first block, add the text:
-
Add an empty picture frame and fit it to the size of the canvas. If the frame covers your text frames, select the picture frame, click Position, and in the Arrange tab, click To back.
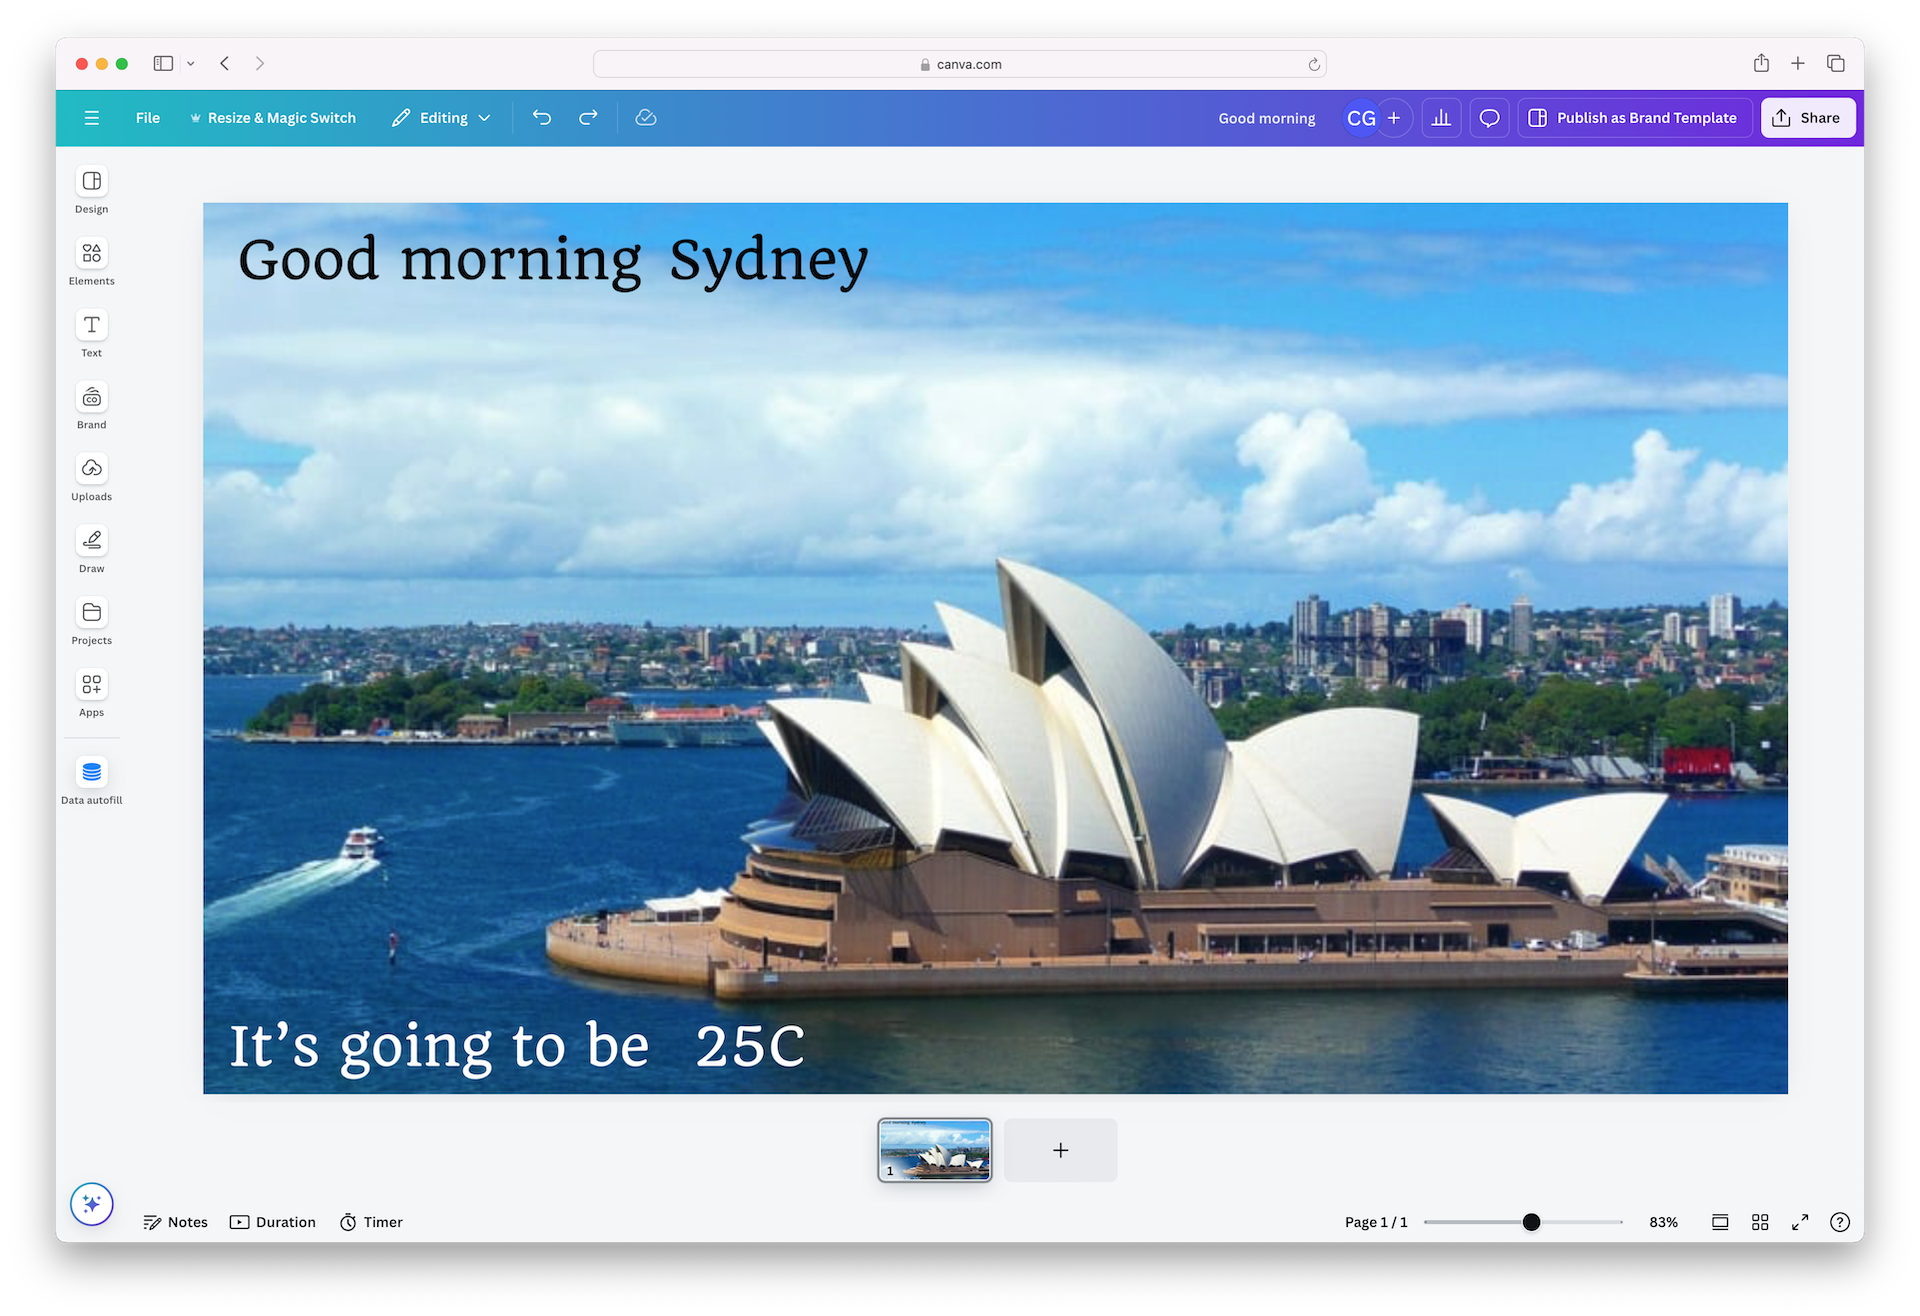
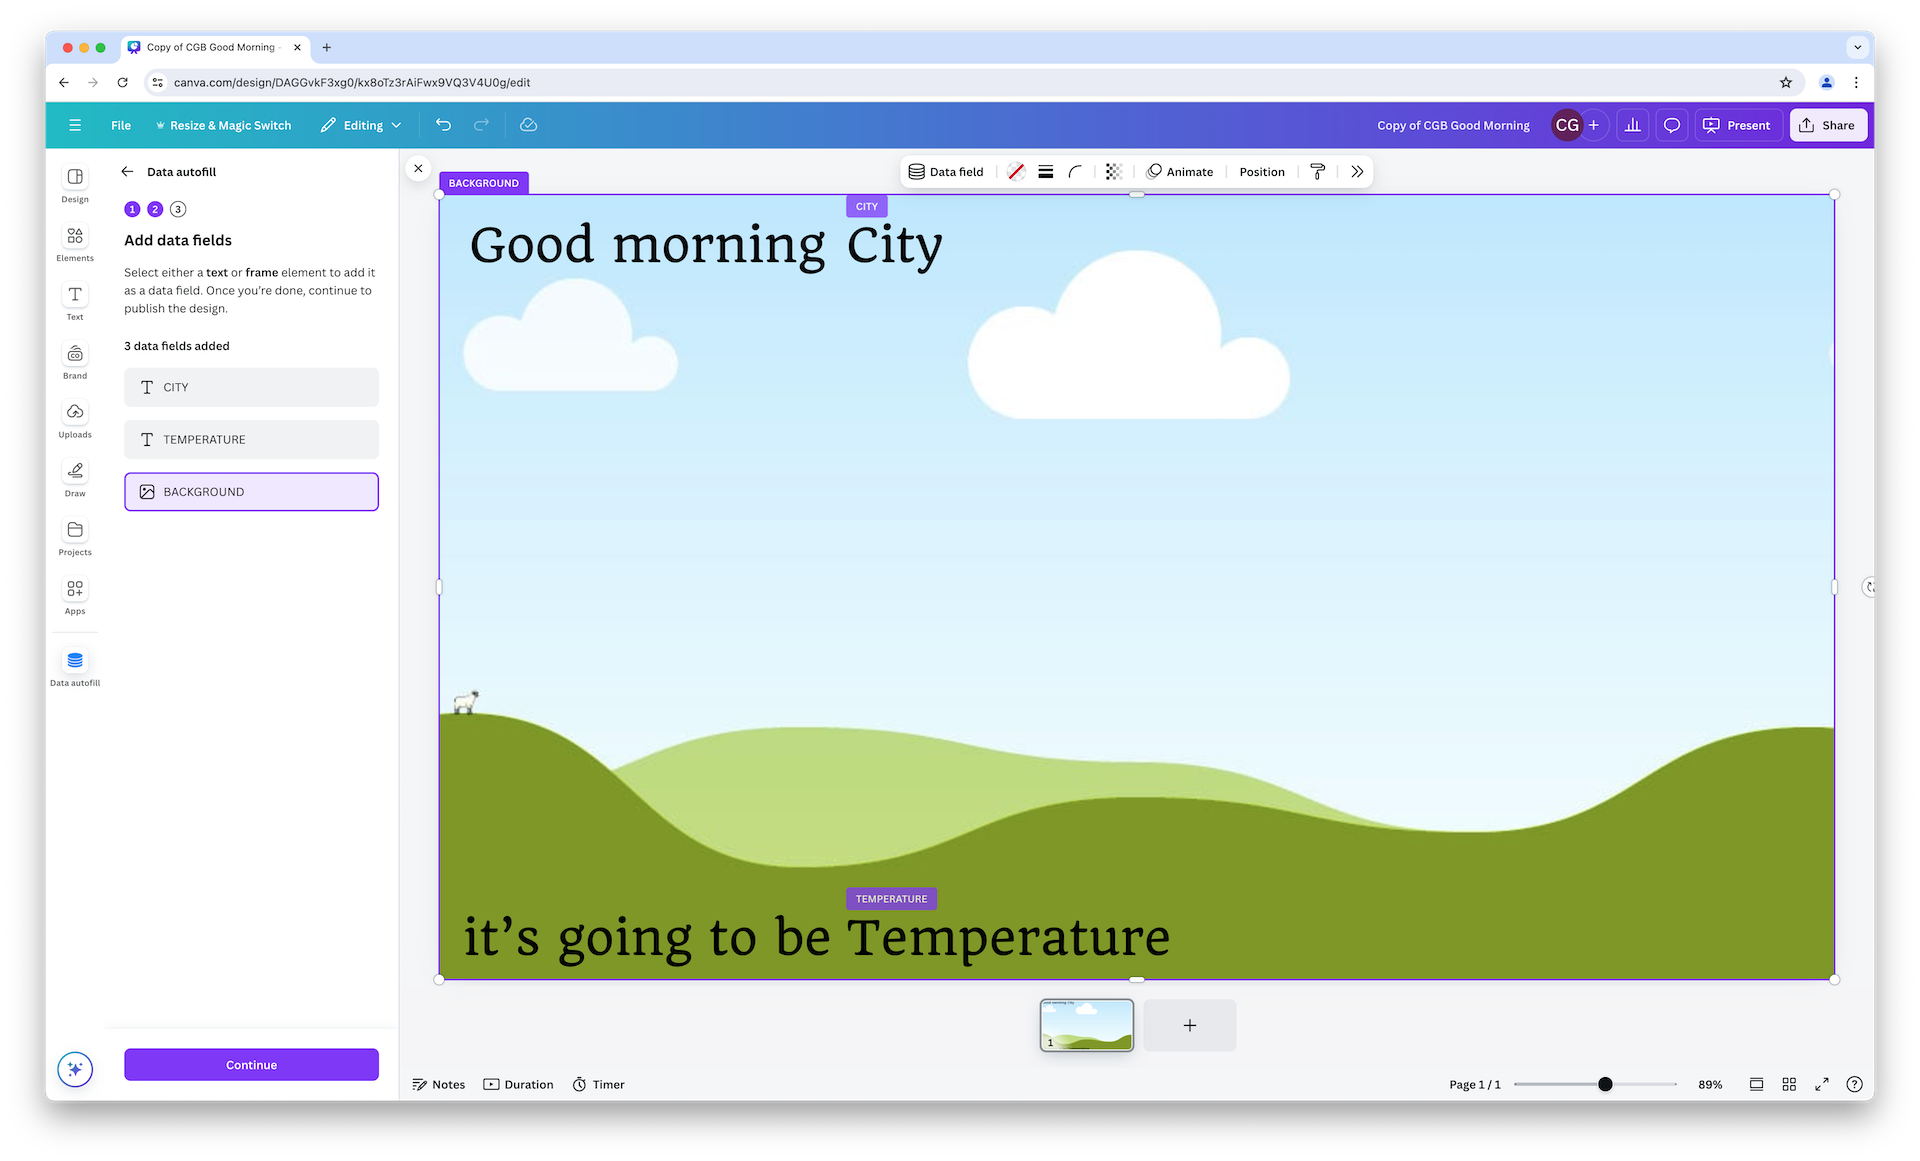
Your design should look something like the following screenshot.
Step 2. Configure the Data autofill app
-
Open the presentation you created in step 1.
-
Using the menu on the left, click Apps, then use Search Canva apps to find the "Data autofill" app.

-
Click the app and select Custom as your data source.
-
In the screen that says "Connect Canva to a custom data source", click Continue.
-
Select the text frame with the placeholder
Cityyou previously created. Click the Data Field button.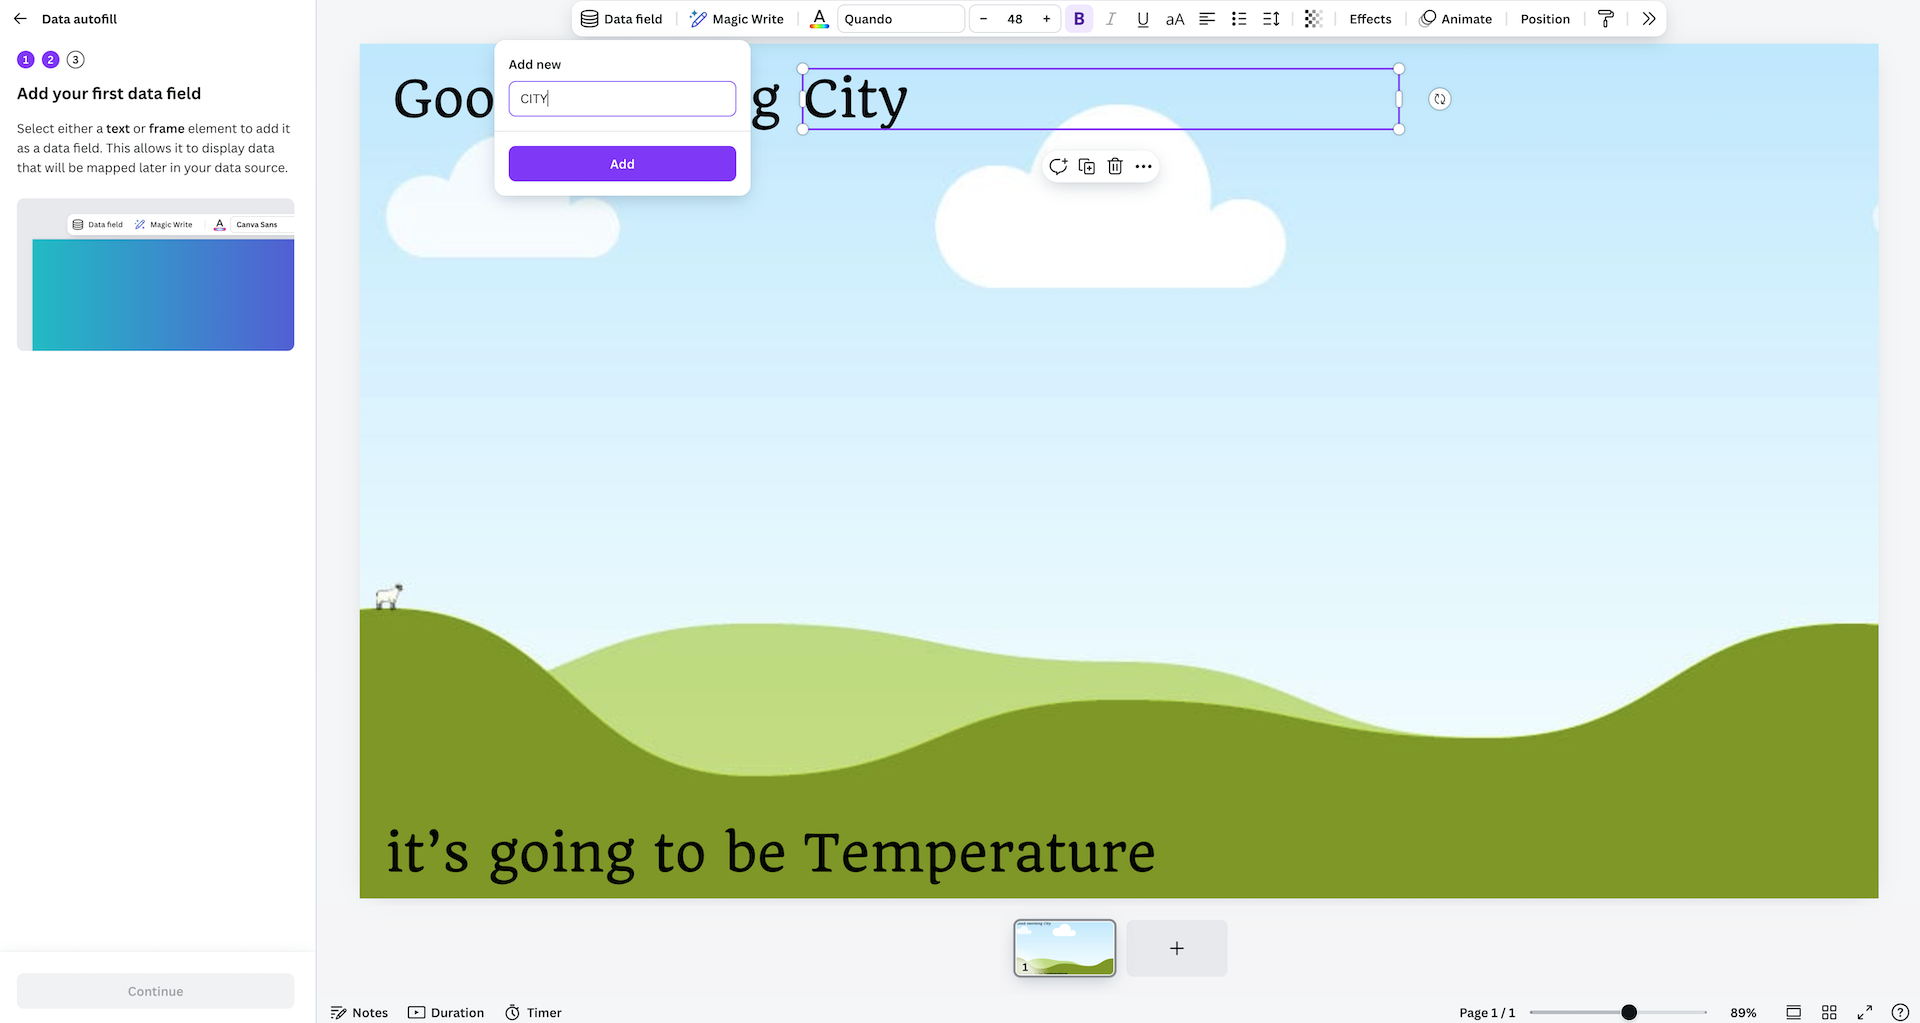
The Data Field button is only visible when the Data autofill app is open. If you navigate to another panel in the editor, for example Design, the Data autofill button is hidden.
Where it says "Enter data field name" type CITY. Repeat this step for the frame with the placeholder text
Temperature, typing TEMPERATURE where it says "Enter data field name". -
Select the picture frame you previously added to cover the background of your design. Click the Data Field button, and type BACKGROUND where it says "Add new".
-
In the Data autofill app, you should have 3 data fields: CITY, TEMPERATURE and BACKGROUND. These are preconfigured as text and image fields, which define (and limit) the type of data they accept when filled with the API.
Step 3. Publish your design as a brand template
Brand templates were migrated to use a new ID format in September 2025. If your integration stores brand template IDs, you'll need to migrate to use the new IDs. Old brand template IDs will continue to be accepted for 6 months to give you time to migrate to the new IDs.
- Publish your design as a brand template(opens in a new tab or window) and note the brand template ID. Locate the brand template ID by examining the URL of your published brand template. For example, in the URL
https://www.canva.com/brand/brand-templates/AEN3TrQftXothe brand template ID is theAEN3TrQftXostring at the end of the URL. - Save the ID so you can query it later with the API.
Configure your integration
Step 1. Create an integration
-
If you haven't already created an integration, follow the steps in Creating integrations to create a new integration.
-
In your integration's configuration on the Developer Portal(opens in a new tab or window), make sure to set the following scopes:
- design:content: Read and Write
- design:meta: Read
- brandtemplate:meta: Read
- brandtemplate:content: Read
If you want to upload assets as part of your autofill workflow, you must also include the
asset:readandasset:writescopes.
After creating your integration, you should have the following details for your integration:
- Your Client ID.
- Your Client secret.
- A list of your integration's scopes.
- At least one authorization redirect URL.
Step 2. Authenticate with OAuth
-
Follow the Authentication guide to get an authorization code, then generate an access token for your requests. For this process you need:
- Your Client ID.
- Your Client secret.
- A URL-encoded list of your integration's scopes.
- One of your nominated redirect URLs.
-
(Optional) If you've already authenticated but your token has expired, you can skip step 1 and request a new token using your refresh token.
When you've successfully authenticated and obtained a bearer token, you're ready to generate your autofilled design.
Generate an autofilled design
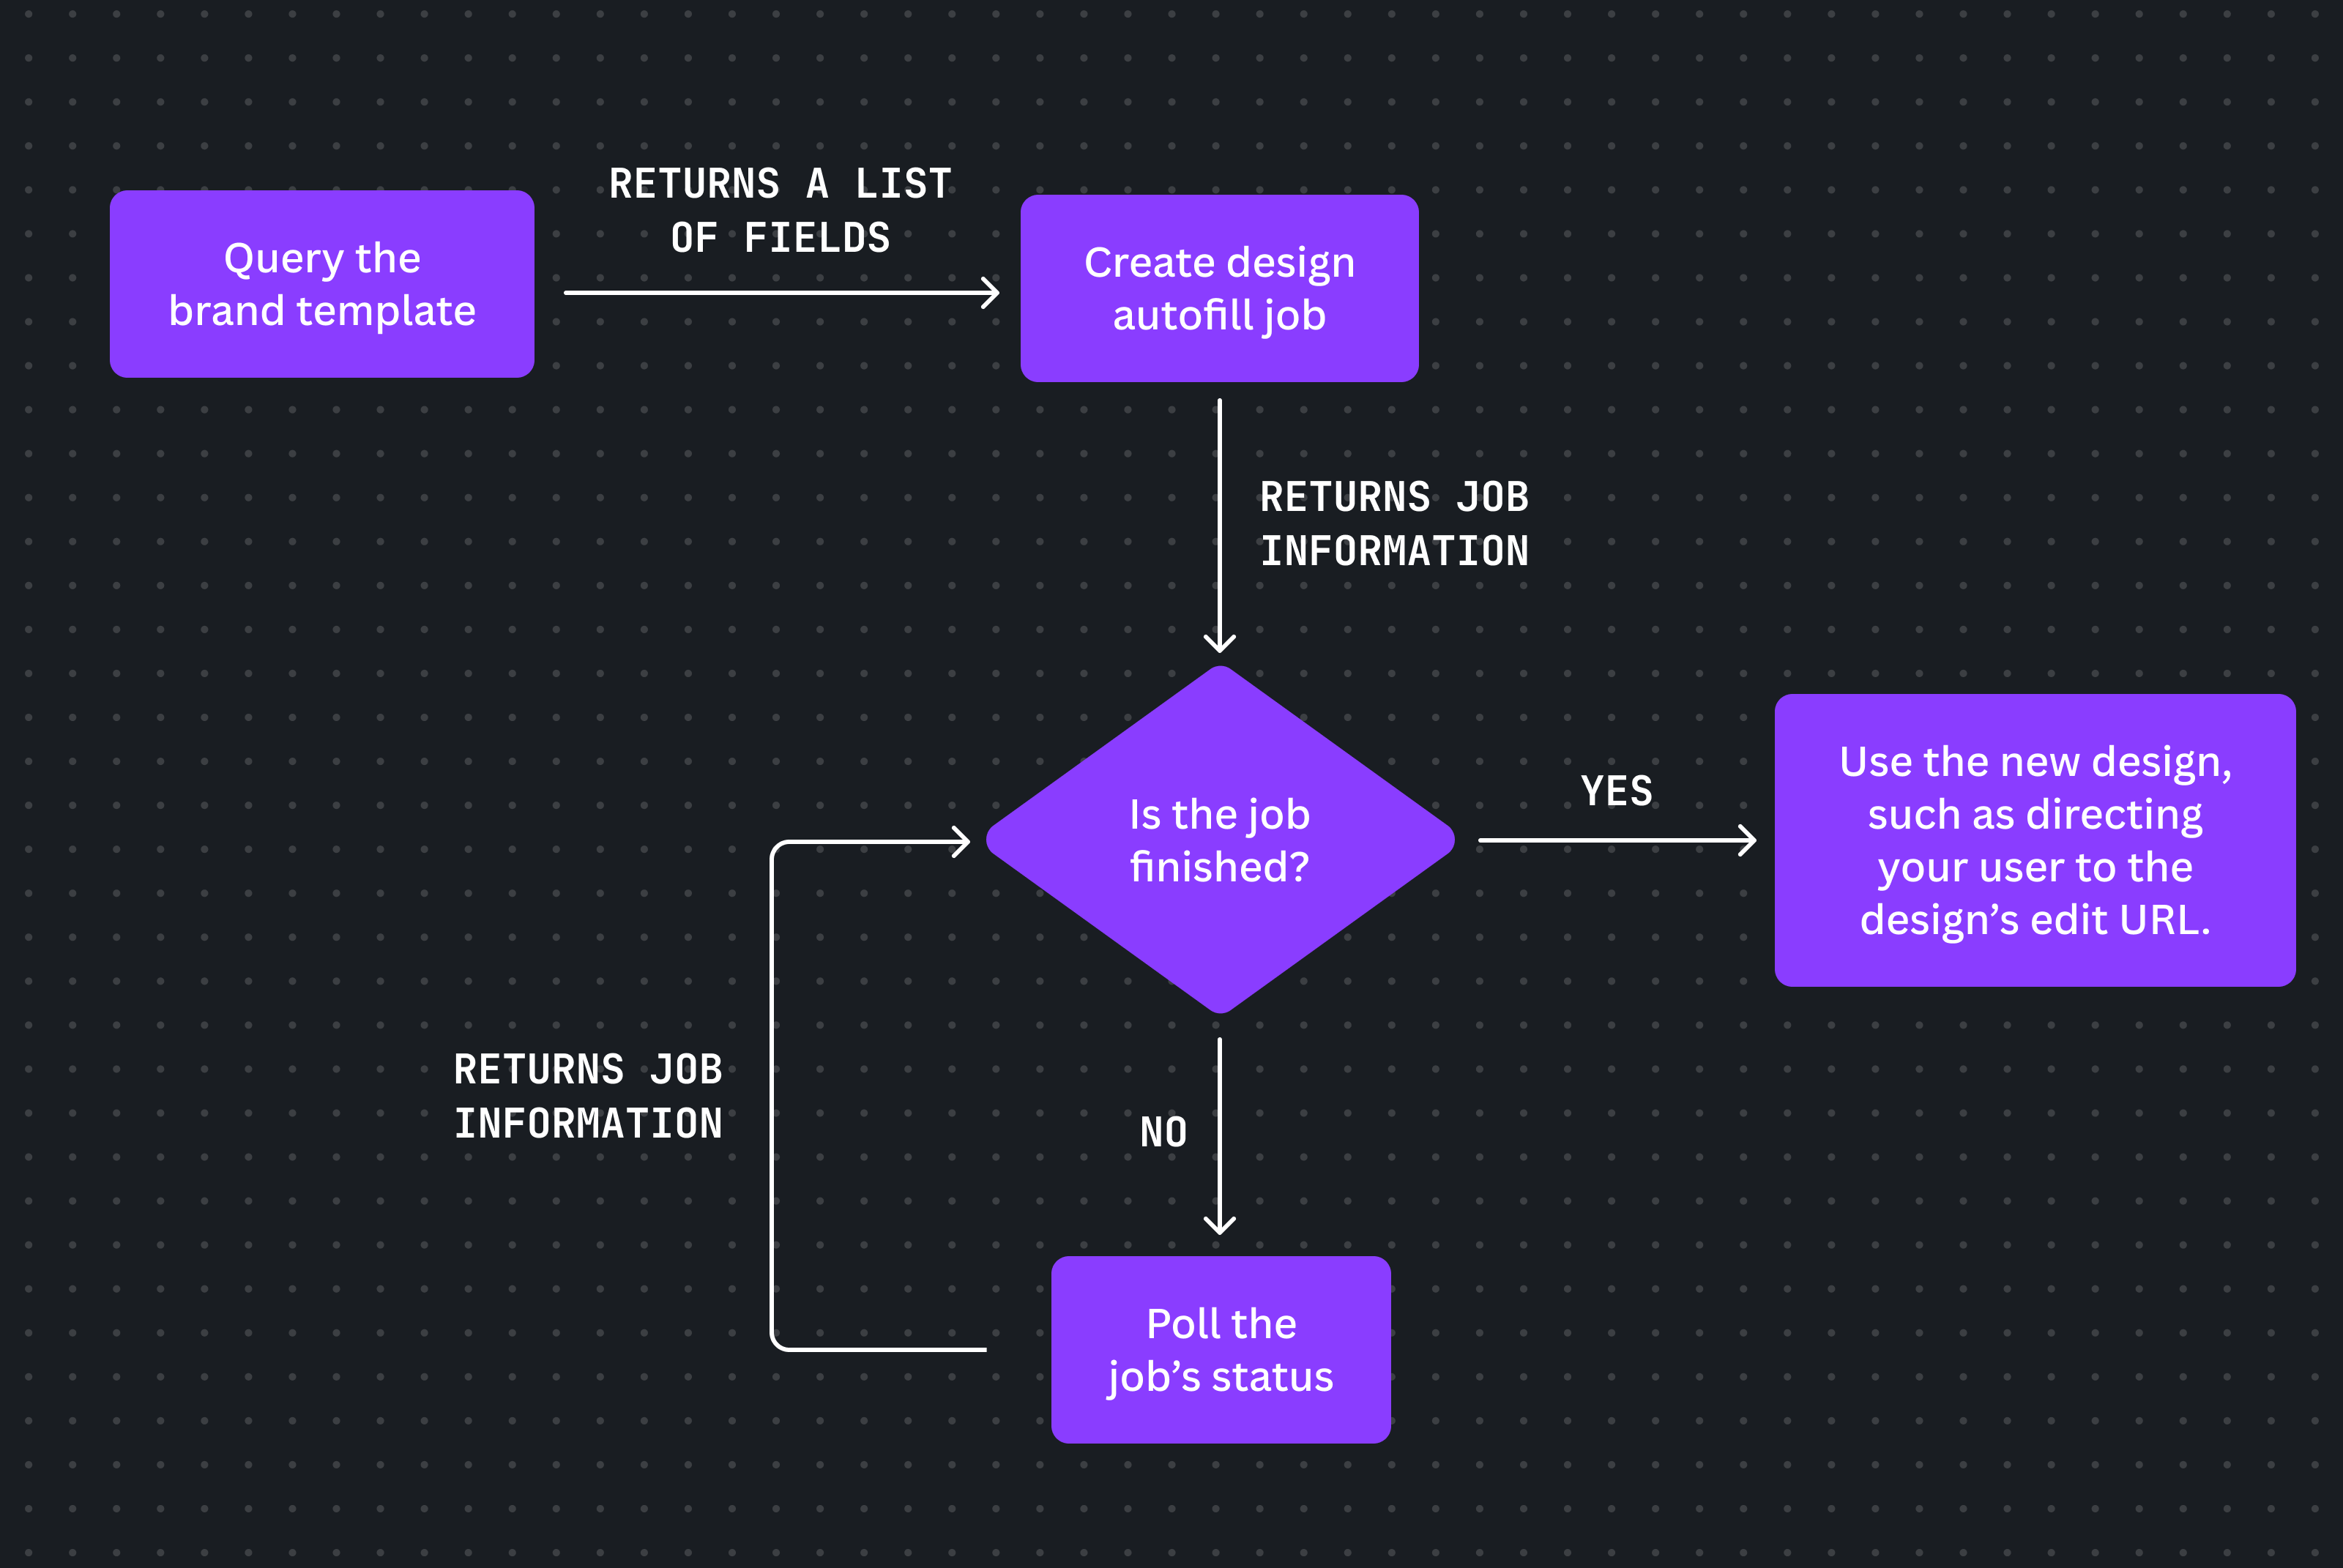
The process of generating an autofilled design involves querying your brand template's dataset, creating an autofill job with your data, and retrieving the generated design.
Step 0. (Optional) Get a list of all brand templates
If you don't know your brand template's ID, you can get a list of all brand templates.
Step 1. Query your brand template
Use the Get brand template dataset API to query your brand template's dataset and get a list of autofillable fields.
-
Request your template's dataset with a call to
GET /brand-templates/{TEMPLATE-ID}/dataset.curl --request GET \--url https://api.canva.com/rest/v1/brand-templates/{TEMPLATE-ID}/dataset \--header 'Authorization: Bearer {TOKEN}'SHELL -
The endpoint returns the available fields and their data type in the
datasetobject.{"dataset": {"CITY": {"type": "text"},"TEMPERATURE": {"type": "text"},"BACKGROUND": {"type": "image"}}}JSON -
(Optional) Upload a new image.
If your template accepts an image field, you can optionally upload a new asset.
Step 2. Create a design autofill job
Use the Create design autofill job API to create your new design, with your autofill data in the body of the request. This API creates an asynchronous job to generate the design.
You don't have to fill every available field. If you omit a field, Canva uses the default value from your template when generating your final design.
-
Initiate your job with a call to
POST /autofills.curl --request POST \--url https://api.canva.com/rest/v1/autofills \--header 'Authorization: Bearer {TOKEN}' \--header 'Content-Type: application/json' \--data '{"brand_template_id": "{TEMPLATE-ID}","data": {"CITY": {"type": "text","text": "Sydney"},"TEMPERATURE": {"type": "text","text": "25C"},"BACKGROUND": {"type": "image","asset_id": "{ASSET-ID}"}}}'SHELL -
The endpoint returns an autofill job with its ID and status.
{"job": {"id": "a71ef223-571c-48a2-9572-e6cf85e3b943","status": "in_progress"}}JSONSave the ID so you can retrieve your design when the job is complete.
Step 3. Get your design autofill job
Asynchronous jobs might take some time to complete. With the job ID from the previous step, use the Get design autofill job API to periodically poll the status of the job until the design is ready.
-
Call
GET /autofills/{JOB-ID}curl --request GET \--url https://api.canva.com/rest/v1/autofills/a71ef223-571c-48a2-9572-e6cf85e3b943 \--header 'Authorization: Bearer {TOKEN}'SHELL -
The endpoint returns the job's status. A successfully completed job has the status
successand includes the design details in the response.{"job": {"id": "{ID}","status": "success","result": {"type": "create_design","design": {"url": "https://www.canva.com/design/{DESIGN-ID}/edit","thumbnail": {"url": "https://export-download.canva.com/{THUMBNAIL-RESOURCE}"}}}}}JSONDirect your user to the design's URL so they can open it in the Canva editor and adjust or export it as required.