Set up Canva audit logs
Canva stores audit log data in an Amazon S3 bucket(opens in a new tab or window) that your organization owns and manages. We add events to your S3 bucket every minute as a gzipped archive containing JSONL(opens in a new tab or window) content. We store the files in hourly folders, in the format orgId/yyyy/MM/dd/HH. To let Canva send audit logs to your S3 bucket, Canva requires PutObject permission(opens in a new tab or window) on the S3 bucket.
To start receiving audit logs, you need to:
- Open the Canva Audit logs configuration page.
- Create an Amazon S3 bucket.
- Grant Canva access to the S3 bucket.
- Save the S3 bucket details to your Canva account.
This article walks you through creating the required AWS resources and adding their details to your Canva account.
Open the Canva Audit logs configuration page
To make the process easier, we recommend you access the Canva Audit logs page(opens in a new tab or window) before creating the AWS resources. This will let you input the required data during each step of the setup process. To access the Canva Audit logs settings:
-
From the Canva homepage, go to Settings
-
Under Organization settings, select Audit logs.
-
Scroll down to the section AWS S3 bucket and role configuration.
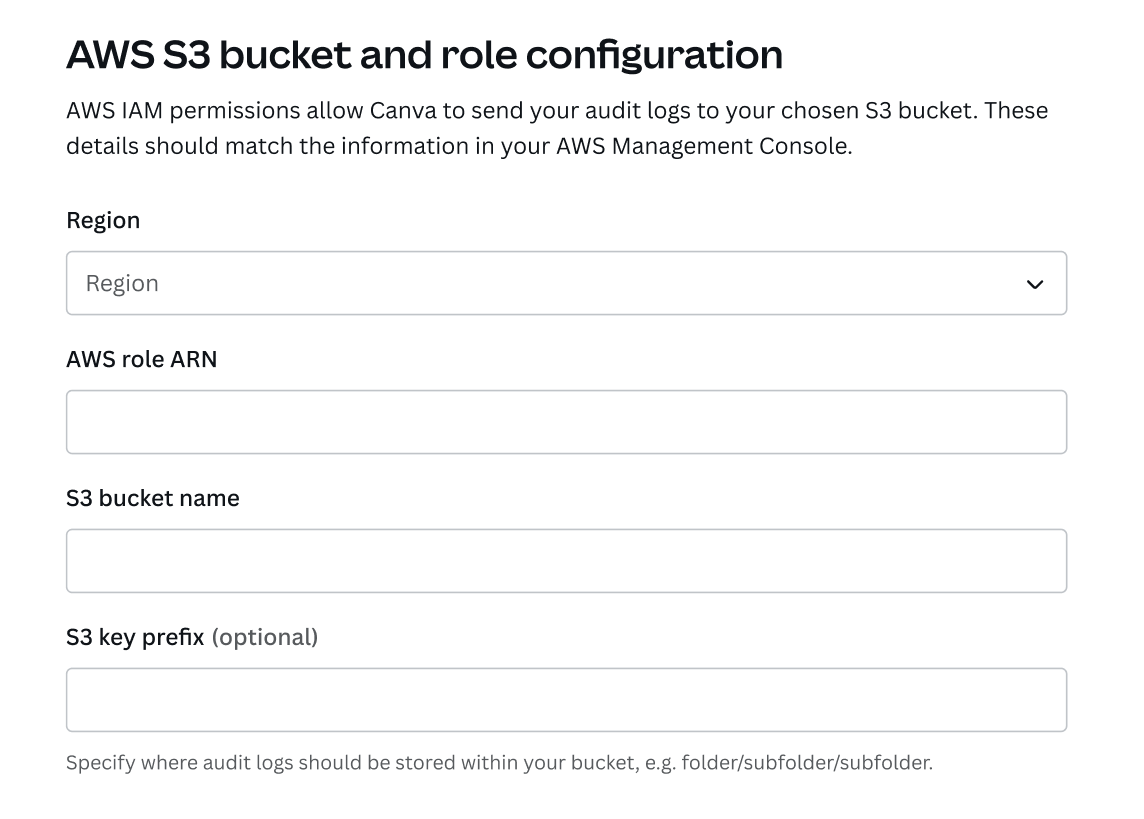 The AWS S3 bucket and role configuration section of the audit logs settings page.
Create an S3 bucket
To create an Amazon S3 Bucket for Canva audit logs:
-
In a new tab or window, sign into the AWS Management Console(opens in a new tab or window).
-
Select Create bucket.
-
Under General configuration:
-
If prompted, choose your preferred AWS Region.
-
If prompted to select a Bucket type, select General purpose.
-
Enter a Bucket name (for example:
canva-audit-logs). -
Update the Canva Audit logs settings page(opens in a new tab or window):
- Select the Region of the S3 bucket.
- Copy the S3 bucket name into the S3 bucket name field.
-
-
Under Object Ownership, select ACLs disabled (recommended).
-
Under Block Public Access settings for this bucket, select Block all public access.
-
Under Default encryption, configure the default encryption for the S3 bucket. If you select an option using AWS Key Management Service (KMS), choose or enter an AWS KMS key.
-
(Optional) Update the remaining settings as desired or leave the default values.
-
Click Create bucket.
If successful, you'll return to the S3 Buckets page with a banner confirming the creation of the bucket.
Make a note of the S3 bucket name. You'll need it when you grant Canva access to the S3 bucket.
Grant Canva access to the S3 bucket
Access to AWS services is managed through AWS Identity and Access Management (IAM). For audit logs, we only support IAM Role-based access(opens in a new tab or window).
You'll need to create a policy, then assign that policy to a role with limited access.
Create a policy using the AWS IAM console
- Open the IAM console(opens in a new tab or window).
- In the navigation pane, under Access management, select Policies.
- On the Policies page, select Create policy.
- On the Specify permissions page, you need to provide a permissions policy. The type of encryption your S3 bucket uses (SSE-S3, SSE-KMS, or DSSE-KMS) determines which policy you need:
-
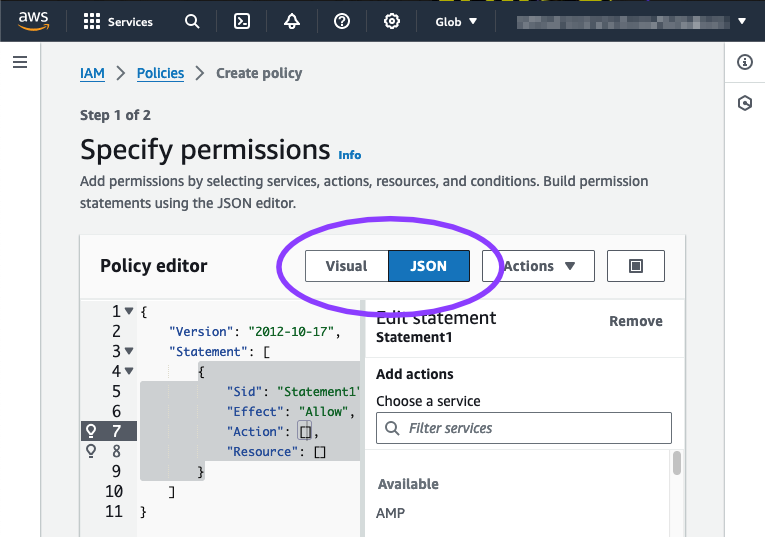
Change the Policy editor from Visual to JSON.
-
Replace the contents of the Policy editor with the following policy:
{"Version": "2012-10-17","Statement": [{"Effect": "Allow","Action": ["s3:PutObject"],"Resource": "arn:aws:s3:::<audit-logs-s3-bucket-name>/*"}]}JSON -
Replace
<audit-logs-s3-bucket-name>with the name of the AWS S3 Bucket.For example, if you named the bucket
canva-audit-logs, the Resource value would bearn:aws:s3:::canva-audit-logs/*.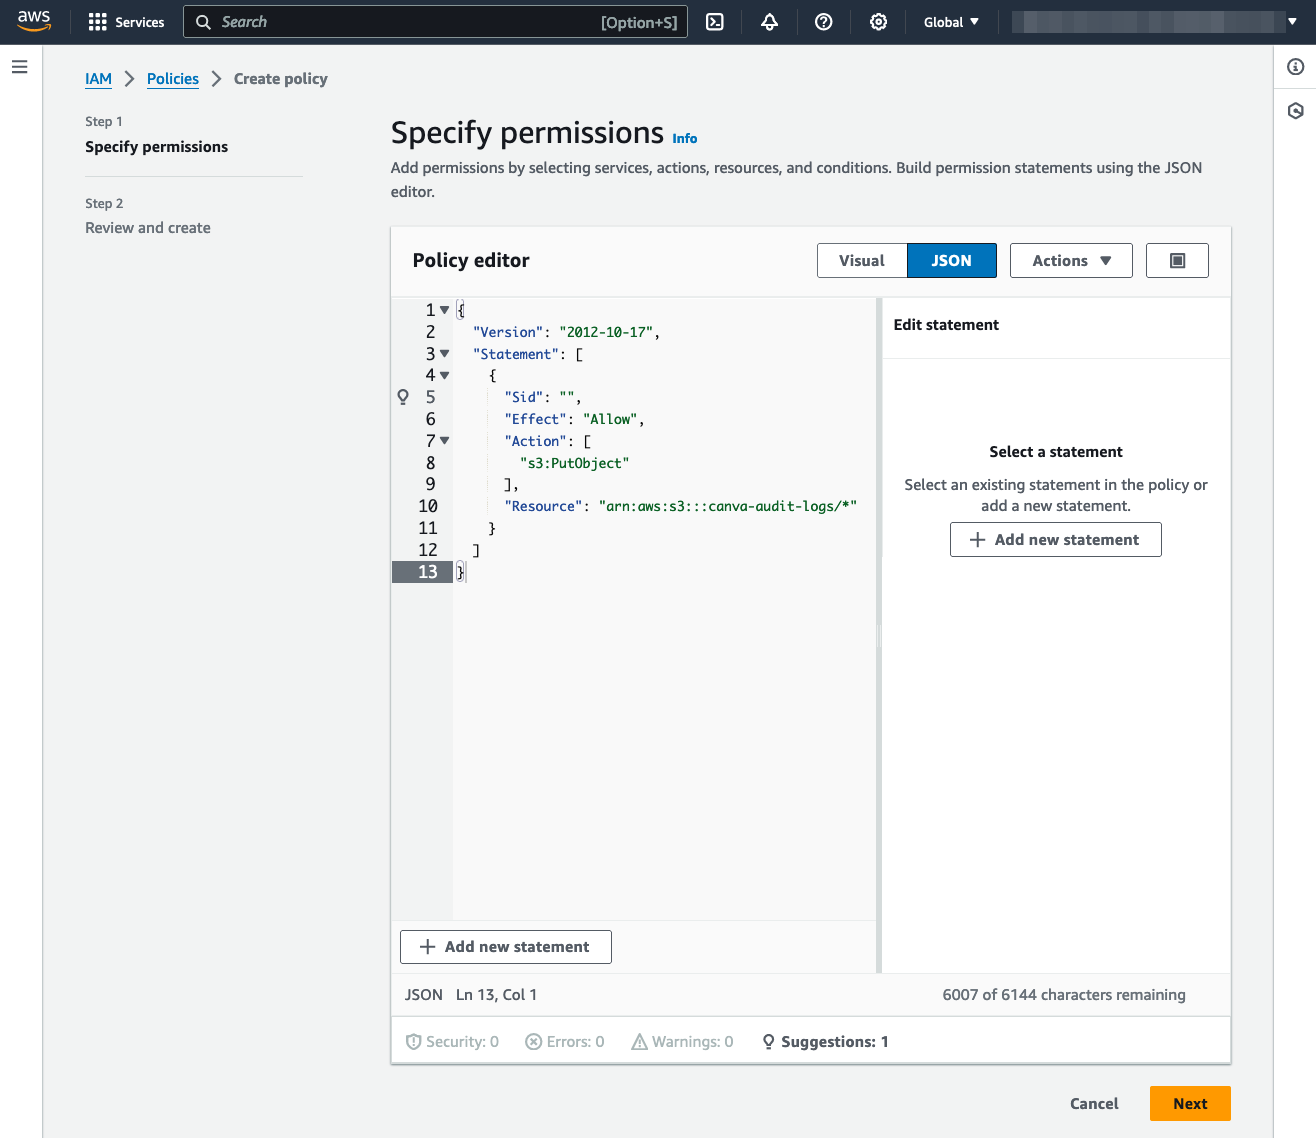
-
Click Next.
-
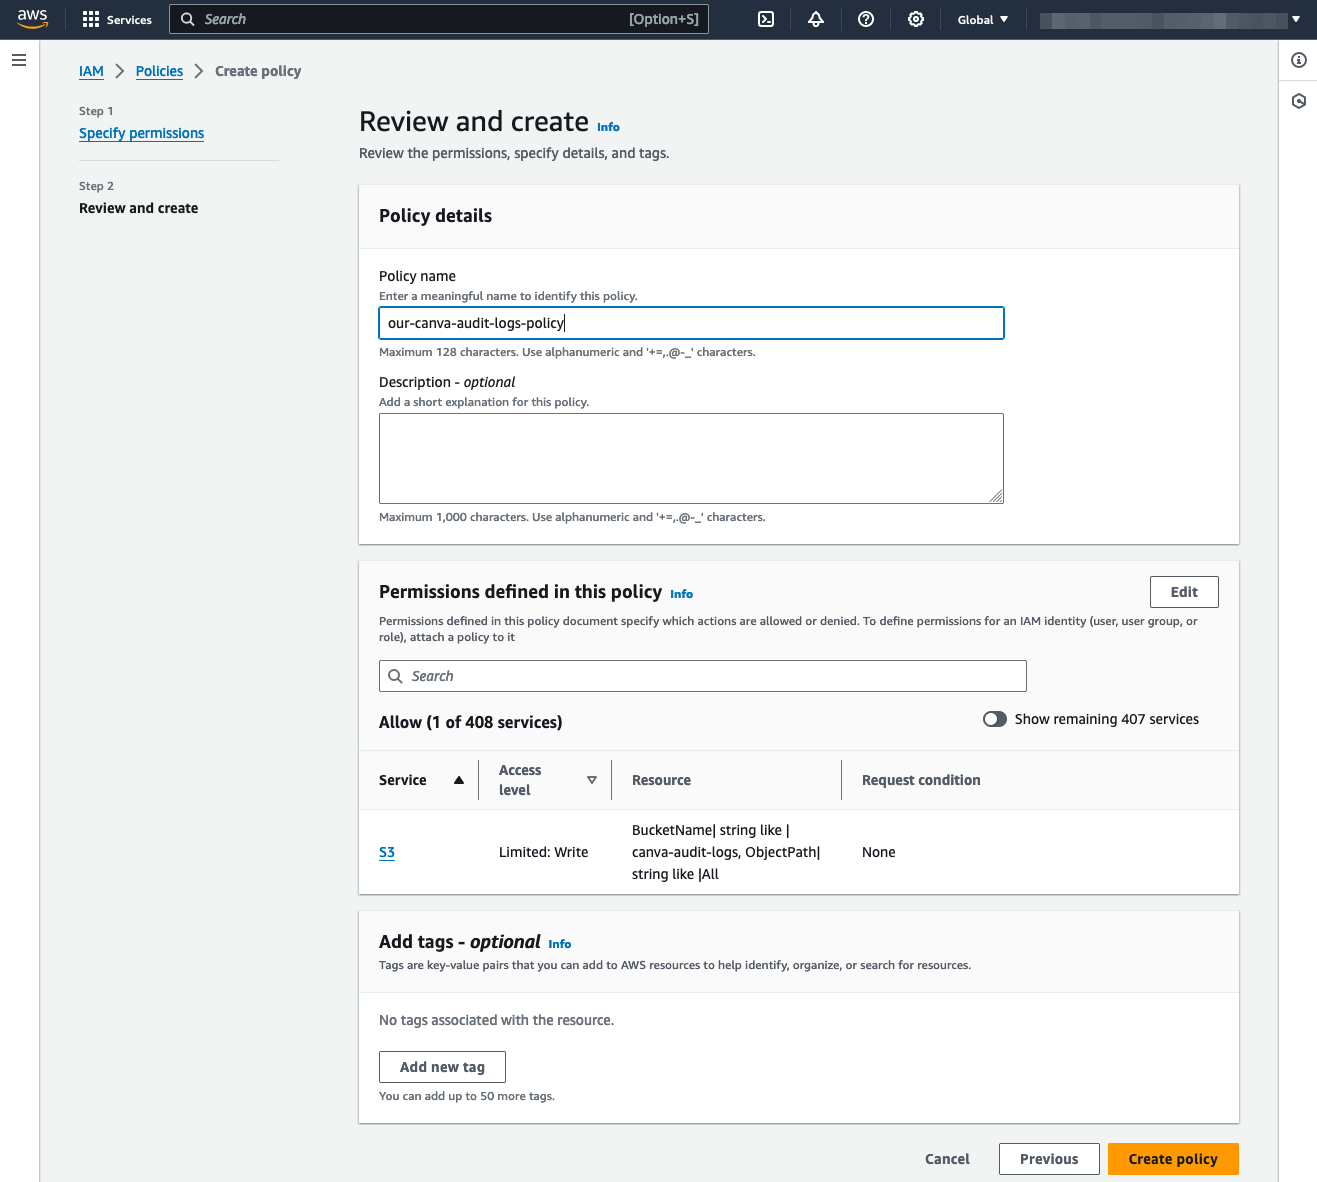
On the Review and create page:
-
Enter a Policy Name (such as:
canva-audit-logs-s3-upload). -
Make sure the policy in Permissions defined in this policy has the correct S3 bucket name. If not, return to the Specify permissions page and update the policy.
-
(Optional) Update Tags and Description; or leave them empty.
-
Click Create policy.
-
-
Change the Policy editor from Visual to JSON.

-
Replace the contents of the Policy editor with the following policy:
{"Version": "2012-10-17","Statement": [{"Effect": "Allow","Action": ["s3:PutObject"],"Resource": "arn:aws:s3:::<audit-logs-s3-bucket-name>/*"},{"Action": "kms:GenerateDataKey","Effect": "Allow","Resource": "<kms-bucket-encryption-key-arn>"}]}JSON -
Replace
<audit-logs-s3-bucket-name>with the name of the AWS S3 Bucket.For example, if you named the bucket
canva-audit-logs, the Resource value would bearn:aws:s3:::canva-audit-logs/*.
-
Replace
<kms-bucket-encryption-key-arn>with the KMS key ARN using the formatarn:aws:kms:{Region}:{Account}:key/{KeyId}. -
Click Next.
-
On the Review and create page:
-
Enter a Policy Name (such as:
canva-audit-logs-s3-upload). -
Make sure the policy in Permissions defined in this policy has the correct S3 bucket name. If not, return to the Specify permissions page and update the policy.
-
(Optional) Update Tags and Description; or leave them empty.

-
Click Create policy.
-
If successful, you'll return to the IAM Policies page with a banner confirming the creation of the policy.
Create a role using the AWS IAM console
-
In the navigation pane, under Access management, select Roles.
-
On the Roles page, select Create role.
-
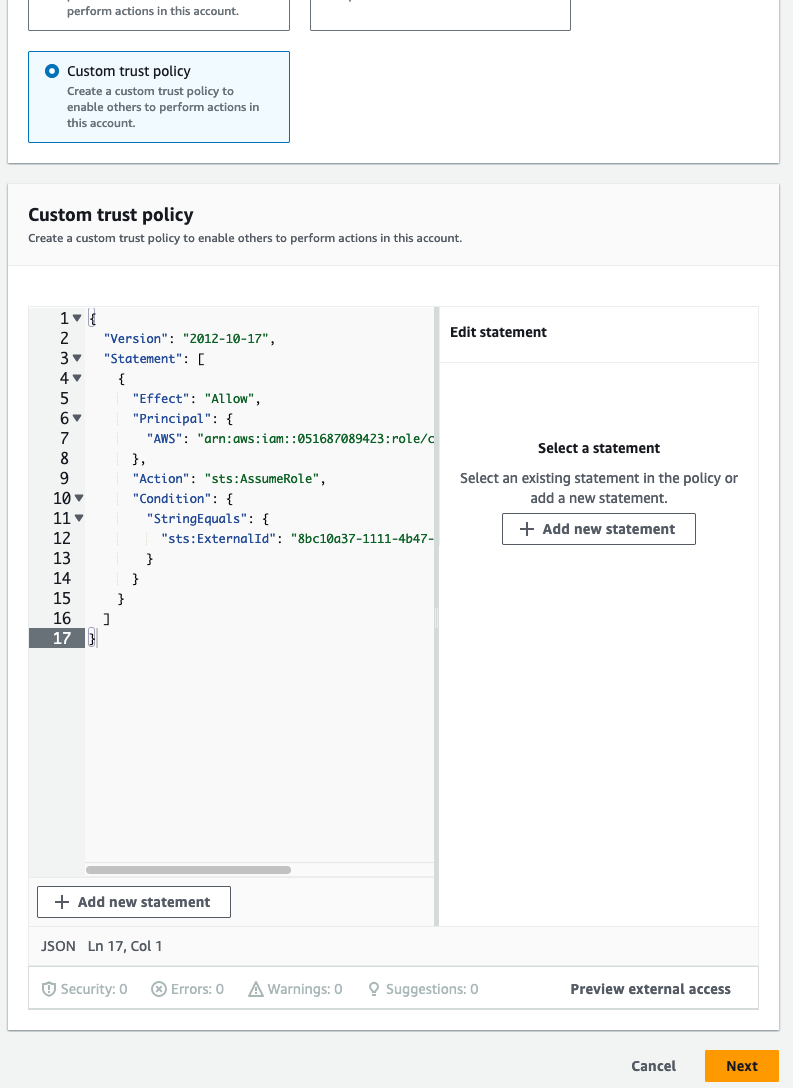
On the Select trusted entity page, under Trusted entity type, select Custom trust policy.
-
In another browser tab or window, visit the Canva Audit logs settings page to get the policy:
-
From the Canva homepage, go to Settings.
-
Under Organization settings, select Audit logs.
-
Under Grant access to Amazon Web Services (AWS), copy the Trust policy.
The Trust policy on the Audit logs page is specific to your organization.
-
-
Return to the AWS IAM Select trusted entity page and paste policy into the Custom trust policy editor.
-
Click Next.
-
On the Add permissions page, select the policy you created (for example:
canva-audit-logs-s3-upload). -
Click Next.
-
Enter a Role name (such as:
canva-audit-logs-s3-upload-role). -
(Optional) Update Description and Tags, or leave them empty.
-
Review Step 1: Select trusted entities and Step 2: Add permissions, making sure that the information is correct.
-
Click Create Role.
If successful, you'll return to the IAM Roles page with a banner confirming the creation of the role.
Get the AWS role ARN
To get the AWS role ARN:
- On the IAM Roles page, find the role you created.
- Click the (hyperlinked) name of the role to view details about the role.
- Under Summary, copy the ARN.
- Return the Canva Audit logs settings page(opens in a new tab or window) and paste the ARN into AWS role ARN.
Save the S3 bucket details to your Canva account
To save the details of the S3 bucket and IAM Role and start audit logging:
-
Return to the Canva Audit logs page.
-
In the section AWS S3 bucket and role configuration, add or check the following details:
- Region: The region of the AWS S3 bucket. For example: US East (N.Virginia). For a list of AWS regions, visit AWS Documentation — Amazon Simple Storage Service endpoints and quotas(opens in a new tab or window).
- AWS role ARN: The Amazon Resource Name ARN(opens in a new tab or window) of the AWS Role Canva will use to access the S3 bucket. For example:
arn:aws:iam:region:account-id:resource-id. - S3 bucket name: The name of your Canva audit logs S3 bucket. For example:
my-canva-audit-logs-bucket. - S3 key prefix: An optional S3 key prefix(opens in a new tab or window). For example:
bucket/canva/auditlogs.
-
Click Save.
If successful, you'll receive and on-screen notification: AWS S3 bucket and role configuration saved. If your users are actively using Canva, audit logs will begin arriving in your S3 bucket within a few minutes.