Migrate an existing app
This procedure describes how to update an existing app to support Canva’s translation process.
The Canva translation process currently requires use of the react-intl library.
Phase 1: Configure your workspace
This phase explains how to configure your environment to use the recommended i18n tools.
Step 1: Install prerequisites
-
Install the
react-intl,@formatjs/cli, and@canva/app-i18n-kitpackages, as well as the latest version of@canva/app-ui-kit:npm install @canva/app-i18n-kit react-intl @canva/app-ui-kit@latest && npm install --save-dev @formatjs/cliSHELLTo be able to localize components, your app must use version 4 or later of the App UI Kit. Older versions of the App UI Kit don't support localization.
Step 2: Configure ESLint
This step explains how to configure ESLint for Canva app development. For more information on the rules and configuration options, see the @canva/app-eslint-plugin documentation(opens in a new tab or window).
-
Install the
@canva/app-eslint-pluginpackage, if not already installed.npm install --save-dev eslint @canva/app-eslint-pluginSHELL -
Add the recommended shared config to your
eslint.config.mjs:
import canvaPlugin from "@canva/app-eslint-plugin";export default [{ignores: ["**/node_modules/","**/dist","**/*.d.ts","**/*.d.tsx","**/*.config.*",],},...canvaPlugin.configs.apps,];
Step 3: Configure webpack for FormatJS
-
Configure the FormatJS TS transformer to automatically generate IDs. To do this, add the
@formatjs/ts-transformerto your webpack configuration:npm install --save-dev @formatjs/ts-transformerSHELL -
To generate unique message IDs, add a transformer to your
webpack.config.js. This example adds a function calledgetCustomTransformers:const { transform } = require("@formatjs/ts-transformer");// ...module: {rules: [{test: /\.tsx?$/,exclude: /node_modules/,use: [{loader: "ts-loader",options: {transpileOnly: true,getCustomTransformers() {return {before: [transform({overrideIdFn: "[sha512:contenthash:base64:6]",}),],};},},},],JSON -
In
package.json, add anextractscript with the following contents:formatjs extract \"src/**/*{ts,tsx}\" --out-file dist/messages_en.jsonJSONAppend the extract script to the build script. For example:
"scripts": {"start": "ts-node «/scripts/start/start.ts",+ "extract": "formatjs extract \"src/**/*{ts,tsx}\" --out-file dist/messages_en.json",+ "build": "webpack --config webpack.config.js --mode production && npm run extract",- "build": "webpack --config webpack.config.js --mode production","lint: types": "tsc","lint": "eslint .","lint:fix": "eslint . --fix",DIFF
Step 4: Configure webpack chunk limit
Canva's app submission process requires a single app bundle. Implementing localization might increase the size of the app and cause webpack to split the bundle into multiple chunks.
To make sure webpack produces a single bundle, use the following steps:
-
Open
webpack.config.js, and add theoptimizemodule to the webpack import:- const { DefinePlugin } = require("webpack");+ const { DefinePlugin, optimize } = require("webpack");DIFF -
In
webpack.config.js, add the chunk limit beforebuildDevConfigis called. Modify thispluginsdefinition(opens in a new tab or window):plugins: [new DefinePlugin({BACKEND_HOST: JSON.stringify(backendHost),}),+ new optimize.LimitChunkCountPlugin({ maxChunks: 1 }),],DIFF
Phase 2: Updating your app
This phase explains how to update your app to support localization.
Step 1: Add the dependency
Add @canva/app-i18n-kit to your app. You don't need to pass messages or locale into AppI18nProvider, because it internally detects the user's locale and loads the appropriate translated messages. In addition, it also lets you test localization in a later step.
// index.tsximport { AppUiProvider } from "@canva/app-ui-kit";import { createRoot } from "react-dom/client";import { App } from "./app";import "@canva/app-ui-kit/styles.css";import { AppI18nProvider } from "@canva/app-i18n-kit";const root = createRoot(document.getElementById("root") as Element);function render() {root.render(<AppI18nProvider><AppUiProvider><App /></AppUiProvider></AppI18nProvider>);}
Don't use IntlProvider from react-intl, since AppI18nProvider is a Canva-specific replacement for IntlProvider.
Step 2: Update UI strings
The react-intl package lets you use FormattedMessage or the useIntl() hook. We recommend using FormattedMessage wherever possible.
In your app’s code, update the UI strings to use FormattedMessage. For example:
<Text><FormattedMessagedescription="Label text for a button. Explains that the image will rotate when pressed"defaultMessage="Rotate the image"/></Text>
If using the useIntl() hook:
const intl = useIntl();// ...<Buttonvariant="primary"icon={RotateIcon}ariaLabel={intl.formatMessage({defaultMessage: "Rotate the image",description:"Label text for a button. Explains that the image will rotate when pressed",})}/>
Phase 3: Testing and release
This phase explains how to test localization in your app and prepare it for release.
Step 1: Testing localization
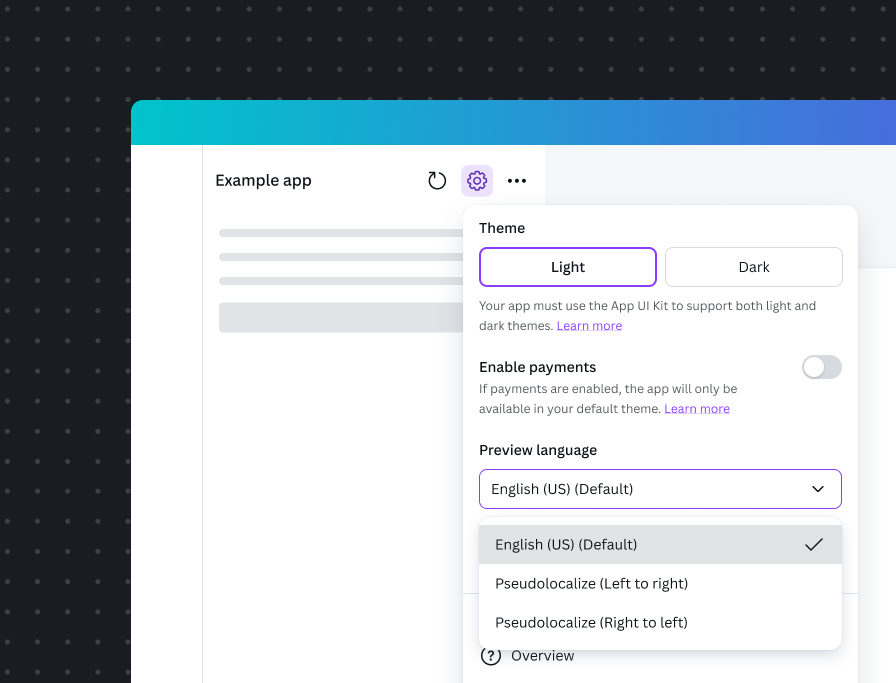
The @canva/app-i18n-kit package lets you test your app using pseudolocalization and lets you change the locale using the Developer menu. This gives you a preview of what your app could look like in a different locale.
The text lets you read your original English text, but inserts non-ASCII characters and adds width to each string to simulate lengthier languages.
This approach is only compatible with our recommended tooling.
-
Enable pseudolocalization in the Developer menu. This shows you a preview of how different characters and text lengths affect the UI:

- Check that any custom components respect the left-to-right and right-to-left setting.
- Make sure there are no rendering issues or truncated text.
You can’t preview or test actual translations, since these are only available after your app has been approved. However, you can then preview the translations before releasing your app.
Step 2: Generate the JSON file
This process extracts all the FormattedMessage strings in your code and saves them to a JSON file. You can then upload this file to Canva for translation.
The recommended tooling automatically generates files in the required format. To generate the messages_en.json file, run the following command:
npm run build
Once this processed has finished, you should see a messages_en.json file appear in the dist directory, alongside your app.js. If this doesn't appear, re-run this step.
Step 3: Upload the JSON file
As part of the app submission process, you can upload the JSON file for translation:
- Locate your app in the Developer Portal.
- Upload the
messages_en.jsonfile, using the Translations file input.
Next steps
Canva reviews your app and identifies which locales should be supported. Canva then performs the translation of the supplied strings. You’ll be automatically notified once Canva has finished the translation process. You can then preview your app in the supported locales.
More information
- Overview of the localization process: Localization overview
- How to use the recommended workflow: Recommended workflow
- Review the localization design guidelines: Localization
- See the supported syntax and exceptions: ICU syntax