Migration guide for authentication
In October 2023, we released breaking changes to the authentication flow for Canva Apps. If you set up authentication for your app before then, you will need to make some changes to the app's backend.
All apps that use authentication must implement these changes, including:
- Public apps and team apps
- Apps built with the Apps SDK or the Extensions API
- Apps that are in development, in review, or already released
If your app is available to the public, you'll also need to notify us once the changes have been made so that we can verify that the changes have been implemented correctly.
This guide explains how to implement, test, and then notify us of the changes.
You only need to update the app's backend. You don't need to — and shouldn't — re-submit your app for review via the Developer Portal(opens in a new tab or window), as doing so will only cause delays.
What's changed?
We've added some steps to the authentication flow to improve the security of the flow. All of the changes are via the app's backend and do not affect the user experience.
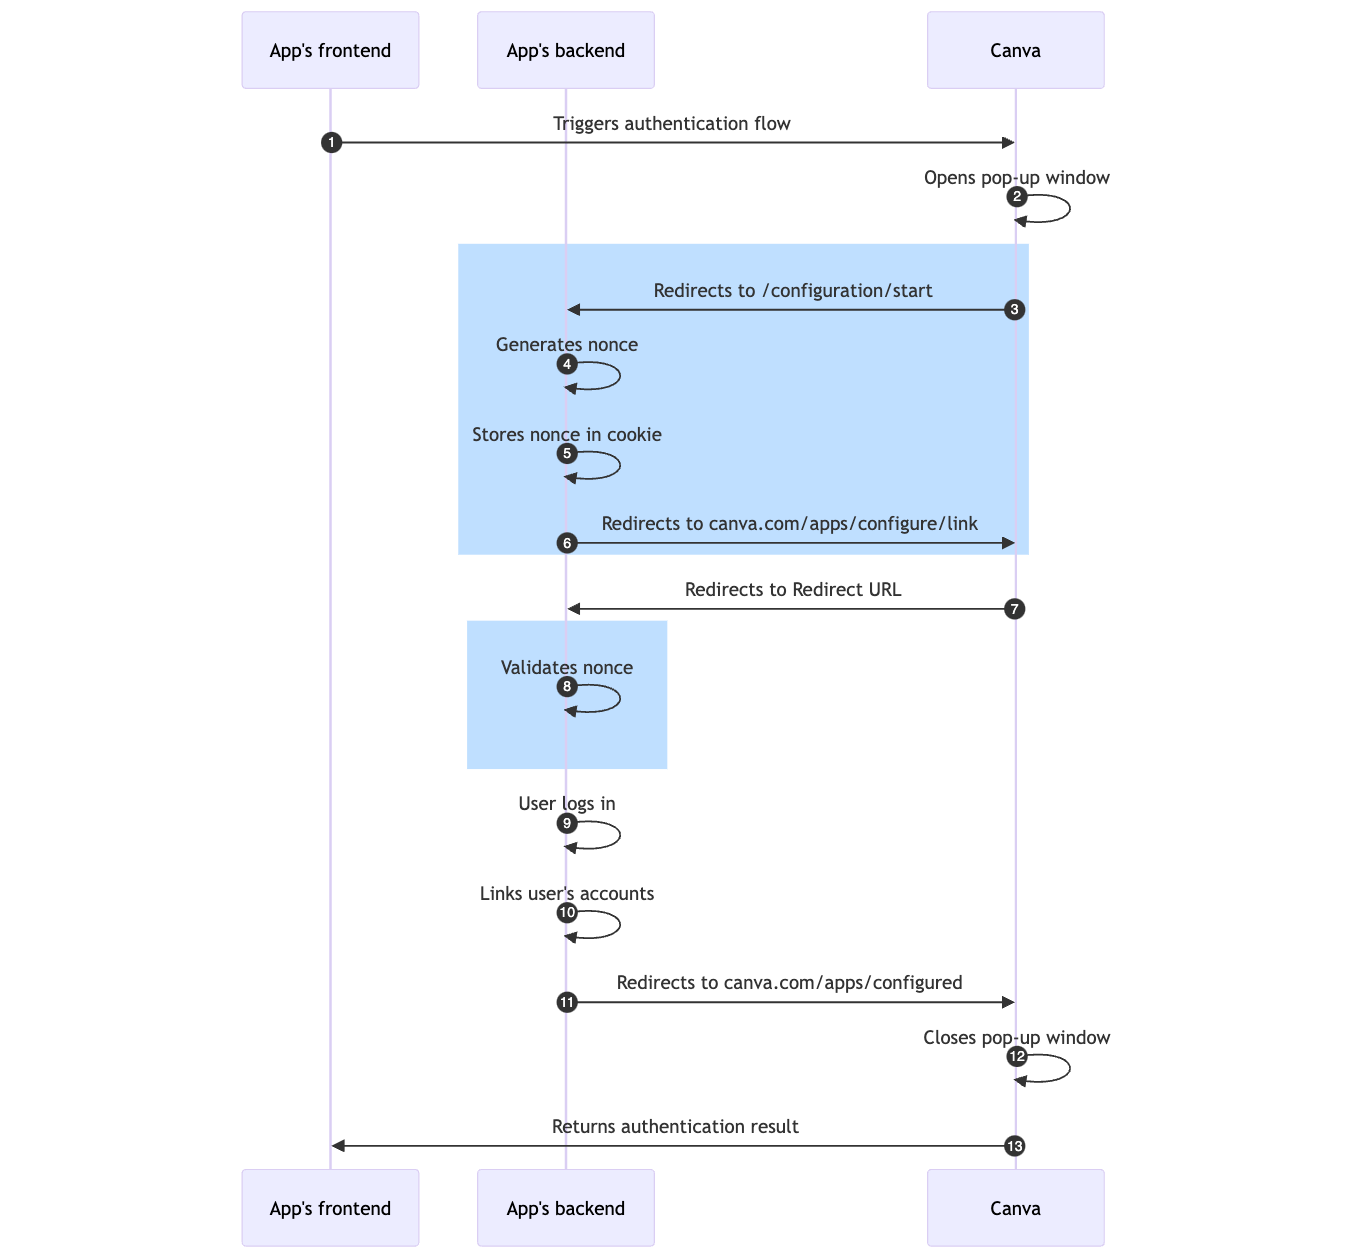
The sequence diagram below shows the updated flow. For the most part, the flow is the same. The steps highlighted with a blue background have been added to the flow.
Updating your app
This section explains how to update the app's backend. To ensure a smooth migration, do not make any other changes to your app during the migration process.
This guide demonstrates how to implement the changes with Express.js. You will need to adapt to the steps to the backend's programming language, framework, and platform.
Step 1: Create a /configuration/start endpoint
In the app's backend, set up the following endpoint to handle GET requests:
<authentication_base_url>/configuration/start
For example:
import * as express from "express";const app = express();app.get("/configuration/start", (req, res) => {// TODO});// Start the serverconst port = process.env.PORT || 3000;app.listen(port, () => {console.log(`Server is running on port ${port}`);});
<authentication_base_url> is a placeholder for the app's Authentication base URL. This is the URL that you've already configured in the Developer Portal, via the Add authentication page.

If your app uses the Apps SDK, do not verify the HTTP request that's sent to this endpoint. It does not have access to the necessary parameters that make verification possible.
When an app triggers an authentication flow, Canva will:
- Open a pop-up window.
- Redirect the user to the
/configuration/startendpoint. - Append a
statequery parameter to the endpoint.
For example, if the Authentication base URL is:
https://www.example.com
Then the complete URL would be:
https://www.example.com/configuration/start?state=<state>
This means that that app's Redirect URL is no longer the first URL that users are taken to. Instead, users will be taken to the Redirect URL in a later step.
Step 2: Generate a nonce for each request
In the /configuration/start endpoint, generate a unique nonce for each request.
A nonce is a random, single-use value that's impossible to guess or enumerate. We recommended using a Version 4 UUID that is cryptographically secure, such as one generated with randomUUID(opens in a new tab or window):
import * as crypto from "crypto";const nonce = crypto.randomUUID();
Not all UUIDs are cryptographically secure, such as ones generated with the uuid(opens in a new tab or window) package.
Step 3: Store the nonce and an expiry time in a cookie
After generating a nonce, set a cookie that contains the nonce and an expiry time.
The cookie should be:
It should also have an expiry time in addition to the expiry time being included in the cookie itself.
By signing a cookie, the app's backend can verify that the user hasn't modified the cookie. This prevents bad actors from tampering with the cookie in the browser.
The steps for setting and signing cookies depend on the framework. Some frameworks automatically sign cookies, while some don't have built-in support for cookie signing and require custom code.
It's beyond the scope of this documentation to explain all of the possible approaches, but refer to the following links to learn more about cookie signing in some popular frameworks:
- Go
- Node.js
- PHP
- Python
- Ruby
The following code sample demonstrates how to set cookies with Express.js and cookieParser(opens in a new tab or window):
import * as express from "express";import * as crypto from "crypto";import * as cookieParser from "cookie-parser";const app = express();// TODO: Load a cryptographically secure secret from an environment variableapp.use(cookieParser("SECRET GOES HERE"));// The expiry time for the nonce, in millisecondsconst NONCE_EXPIRY_MS = 5 * 60 * 1000; // 5 minutesapp.get("/configuration/start", (req, res) => {// Generate a nonceconst nonce = crypto.randomUUID();// Create an expiry time for the nonceconst nonceExpiry = Date.now() + NONCE_EXPIRY_MS;// Store the nonce and expiry time in a stringified JSON arrayconst nonceWithExpiry = JSON.stringify([nonce, nonceExpiry]);// Store the nonce and expiry time in a cookieres.cookie("nonceWithExpiry", nonceWithExpiry, {httpOnly: true,secure: true,signed: true,maxAge: NONCE_EXPIRY_MS,});});
It's worth nothing that:
- To sign a cookie, you need a cryptographically secure secret, such as one generated by the
randomUUIDmethod. This secret should:- be loaded via an environment variable
- not change between server restarts
- not be committed to source control
- To store the nonce and an expiry time in a cookie, the above code sample stringifies a JSON array that contains both of the values, but there are other ways to accomplish the same outcome.
- You should be mindful of framework-specific nuances. For example, in Express.js, the
maxAgeproperty is set in milliseconds, but theMax-Age(opens in a new tab or window) attribute value must be set in seconds.
Step 4: Redirect the user back to Canva
After setting the cookie, redirect the user to the following URL with a 302 redirect:
https://www.canva.com/apps/configure/link?state=<state>&nonce=<nonce>
You'll need to:
- Replace
<state>with thestatequery parameter that Canva includes with the request. - Replace
<nonce>with the nonce that was stored in the cookie.
For example:
// Extract state from query parametersconst { state } = req.query;// Create query parametersconst params = new URLSearchParams({state,nonce,});// Redirect the userres.redirect(302,`https://www.canva.com/apps/configure/link?${params.toString()}`);
Step 5: Validate the nonce
After the previously described redirect, Canva will redirect the user to the app's Redirect URL with a nonce query parameter appended to the URL (in addition to some other parameters).
Before attempting to authenticate the user, the app's backend must validate that the nonce query parameter and the nonce stored in the cookie:
- are strings
- are not empty strings
- are equal to one another
You will also need to:
- Verify that the current time does not exceed the nonce's expiry time.
- Clear the cookie as soon as you have a local reference to it.
The end result should be that, if someone who didn't initiate the authentication flow were to visit the Redirect URL, the request would fail since they wouldn't have the expected cookie on their machine.
Handling invalid nonces
If the nonce validation fails, redirect the user to the following URL with a 302 redirect:
https://www.canva.com/apps/configured?success=false&state=<state>&errors=<errors>
You'll need to:
- Replace
<state>with thestatequery parameter that Canva includes with the request. - Replace
<errors>with a comma-separated list of one or more error codes. You can define the error codes yourself. They will be passed as-is to the app's frontend. (This only applies to the Apps SDK. You can omit theerrorsparameter for apps built with the Extensions API.)
For example:
// Get the nonce from the query parameterconst nonceQuery = req.query.nonce;// Get the nonce with expiry time from the cookieconst nonceWithExpiryCookie = req.signedCookies.nonceWithExpiry;try {// Parse the JSON that contains the nonce and expiry timeconst nonceWithExpiry = JSON.parse(nonceWithExpiryCookie);// Extract the nonce and expiry timeconst [nonceCookie, nonceExpiry] = nonceWithExpiry;// Clear the cookieres.clearCookie("nonceWithExpiry");// If the nonces are invalid, terminate the authentication flowif (Date.now() > nonceExpiry || // The nonce has expiredtypeof nonceCookie !== "string" || // The nonce in the cookie is not a stringtypeof nonceQuery !== "string" || // The nonce in the query parameter is not a stringnonceCookie.length < 1 || // The nonce in the cookie is an empty stringnonceQuery.length < 1 || // The nonce in the query parameter is an empty stringnonceCookie !== nonceQuery // The nonce in the cookie does not match the nonce in the query parameter) {const params = new URLSearchParams({success: "false",state: req.query.state,errors: "invalid_nonce",});return res.redirect(302,`https://www.canva.com/apps/configured?${params.toString()}`);}} catch (e) {// An unexpected error has occurred (e.g. JSON parsing error)const params = new URLSearchParams({success: "false",state: req.query.state,errors: "invalid_nonce",});return res.redirect(302,`https://www.canva.com/apps/configured?${params.toString()}`);}
We also recommend logging a security alert, as invalid nonces suggest a potential threat.
Handling valid nonces
If the nonce validation succeeds, continue the authentication flow as per usual — allow the user to log into their account, link the user with their Canva account, etc. This part of the flow has not changed.
Code sample
The following code sample demonstrates how to follow these steps with Express.js:
import * as express from "express";import * as crypto from "crypto";import * as cookieParser from "cookie-parser";const app = express();// TODO: Load a cryptographically secure secret from an environment variableapp.use(cookieParser("SECRET GOES HERE"));// The expiry time for the nonce, in millisecondsconst NONCE_EXPIRY_MS = 5 * 60 * 1000; // 5 minutesapp.get("/configuration/start", (req, res) => {// Generate a nonceconst nonce = crypto.randomUUID();// Create an expiry time for the nonceconst nonceExpiry = Date.now() + NONCE_EXPIRY_MS;// Store the nonce and expiry time in a JSON stringconst nonceWithExpiry = JSON.stringify([nonce, nonceExpiry]);// Store the nonce and expiry time in a cookieres.cookie("nonceWithExpiry", nonceWithExpiry, {httpOnly: true,secure: true,signed: true,maxAge: NONCE_EXPIRY_MS,});// Extract state from query parametersconst { state } = req.query;// Create query parametersconst params = new URLSearchParams({state,nonce,});// Redirect the userres.redirect(302,`https://www.canva.com/apps/configure/link?${params.toString()}`);});app.get("/redirect-url", function (req, res) {// Get the nonce from the query parameterconst nonceQuery = req.query.nonce;// Get the nonce with expiry time from the cookieconst nonceWithExpiryCookie = req.signedCookies.nonceWithExpiry;try {// Parse the JSON that contains the nonce and expiry timeconst nonceWithExpiry = JSON.parse(nonceWithExpiryCookie);// Extract the nonce and expiry timeconst [nonceCookie, nonceExpiry] = nonceWithExpiry;// Clear the cookieres.clearCookie("nonceWithExpiry");// If the nonces are invalid, terminate the authentication flowif (Date.now() > nonceExpiry || // The nonce has expiredtypeof nonceCookie !== "string" || // The nonce in the cookie is not a stringtypeof nonceQuery !== "string" || // The nonce in the query parameter is not a stringnonceCookie.length < 1 || // The nonce in the cookie is an empty stringnonceQuery.length < 1 || // The nonce in the query parameter is an empty stringnonceCookie !== nonceQuery // The nonce in the cookie does not match the nonce in the query parameter) {const params = new URLSearchParams({success: "false",state: req.query.state,errors: "invalid_nonce",});return res.redirect(302,`https://www.canva.com/apps/configured?${params.toString()}`);}} catch (e) {// An unexpected error has occurred (e.g. JSON parsing error)const params = new URLSearchParams({success: "false",state: req.query.state,errors: "invalid_nonce",});return res.redirect(302,`https://www.canva.com/apps/configured?${params.toString()}`);}// This is where you should authenticate the user, etc. You should have// already written this code and it should not need to be updated.});// Start the serverconst port = process.env.PORT || 3000;app.listen(port, () => {console.log(`Server is running on port ${port}`);});
Testing your changes
Step 1: Set up a testing or staging environment
To test the changes, Canva needs to be able to send requests to the app's backend. This means the backend must be exposed via the internet. To ensure a smooth migration, we recommend testing the changes via a non-production environment, such as a staging environment.
If you don't have a non-production environment ready to go, we recommend using an SSH tunneling service, such as ngrok(opens in a new tab or window), to expose your local development server to the internet.
There are inherent risks in using tools such as ngrok. Be careful about what you expose to the public internet and shut-down the ngrok tunnel as soon as you're done using it.
Step 2: Create a new version of the app
Once you release an app, you can't configure its settings via the Developer Portal. This means you can't update the Redirect URL or Authentication base URL to point to their non-production versions.
To address this, create a new version of the app:
- Log in to the Developer Portal.
- Navigate to the app via the Your apps(opens in a new tab or window) page.
- Click Create a new version.
The new version of the app will be in the draft state, so any changes will only be visible to you.
Do not submit this new version of the app as part of the migration process. You should only be using this version for testing purposes.
Step 3: Update the app's authentication settings
- In the Developer Portal, navigate to the app's Add authentication page.
- Update the Redirect URL so it points to the non-production version.
- Update the Authentication base URL so it points to the non-production version.
Step 4: Test the authentication flow
Start by testing the "happy path" to verify that the core authentication flow works as expected. You should be able to log in, sign up, etc. The user experience should not have changed.
Then test the scenarios described below. Each of the scenarios should terminate the authentication flow by closing the popup window and returning an error to the app's frontend.
Be sure to test the scenarios independently from one another — that is, in separate authentication flows — to ensure that you don't conflate the results of each test.
Scenario 1: The nonce query parameter doesn't exist
- Start an authentication flow.
- After the Redirect URL loads, remove the
noncequery parameter from the URL. - Navigate to the updated URL.
Scenario 2: The nonce query parameter contains a modified value
- Start an authentication flow.
- After the Redirect URL loads, modify the
noncequery parameter in the URL — for example, by adding or removing a character. - Navigate to the updated URL.
Scenario 3: The cookie doesn't exist
- Start an authentication flow.
- After the Redirect URL loads, delete the cookie that contains the nonce. (See below.)
- Reload the page.
How to delete cookies in Google Chrome
- Open the JavaScript Console.
- Navigate to the Application tab.
- Expand the Storage > Cookies section.
- Select the domain of the Redirect URL.
- Right-click the relevant cookie.
- Click Delete.
Scenario 4: The cookie doesn't exist and the nonce query parameter doesn't exist
- Start an authentication flow.
- After the Redirect URL loads:
- Delete the cookie that contains the nonce.
- Remove the
noncequery parameter from the URL.
- Navigate to the updated URL.
Notifying Canva of the changes
After making and testing the changes to the app, you need to notify us so that we can verify the changes have been implemented correctly. To notify us, create a support ticket(opens in a new tab or window).
In the ticket, include credentials that we can use to test the authentication flow.
Once we've been notified of the change, we aim to re-enable apps within 24 hours. To ensure that this process goes smoothly, double-check that the changes have been implemented correctly.
Additional documentation
Apps SDK
The complete authentication flow for the Apps SDK is documented in Authenticating users.
Extensions API
The complete authentication flow for the Extensions API is documented in the following topics: