OAuth integration
Introduction
If your app requires access to resources on a third-party platform (e.g. Google Drive), you can use OAuth to simplify the authorization process for your users. This method allows users to securely grant your app the necessary permissions with a third party service without exposing user credentials.
Canva enhances this process by handling the OAuth flow and the management of access and refresh tokens. This means that Canva does the heavy lifting in ensuring that your app maintains continuous and security-hardened access to the third-party resources it needs, streamlining the user experience and reducing the development burden on your team. Canva currently supports the authorization code flow, with and without Proof-of Key Code Exchange (PKCE).
The authentication API makes it easier to adopt the industry-standard OAuth 2, because Canva's servers are responsible for interacting directly with your chosen Identity Provider (IdP) — including exchanging authorization codes for tokens.
To learn more about the OAuth concepts and terminology, see Key terms.
Overview
To implement OAuth in your app, just do the following:
- Configure your chosen identity provider (such as Google or Facebook or your own backend that supports OAuth).
- Copy the configuration details into Canva's Developer Portal.
- Call the API method
oauth.requestAuthorizationmethod in your app. - Canva retrieves and stores refresh tokens and access tokens.
- Use the API method
getAccessTokento retrieve the latest access token. - Use
fetchwith the authorization headerBearer <access token>
With this approach, you won't need an additional server to store client IDs, client secrets, access or refresh tokens. You also don't need to handle the token expiry, because Canva does all of this for you.
For more information about the OAuth standard, see RFC6749(opens in a new tab or window).
OAuth workflow: Authentication capability
The following diagram demonstrates the OAuth workflow with the Canva capability.
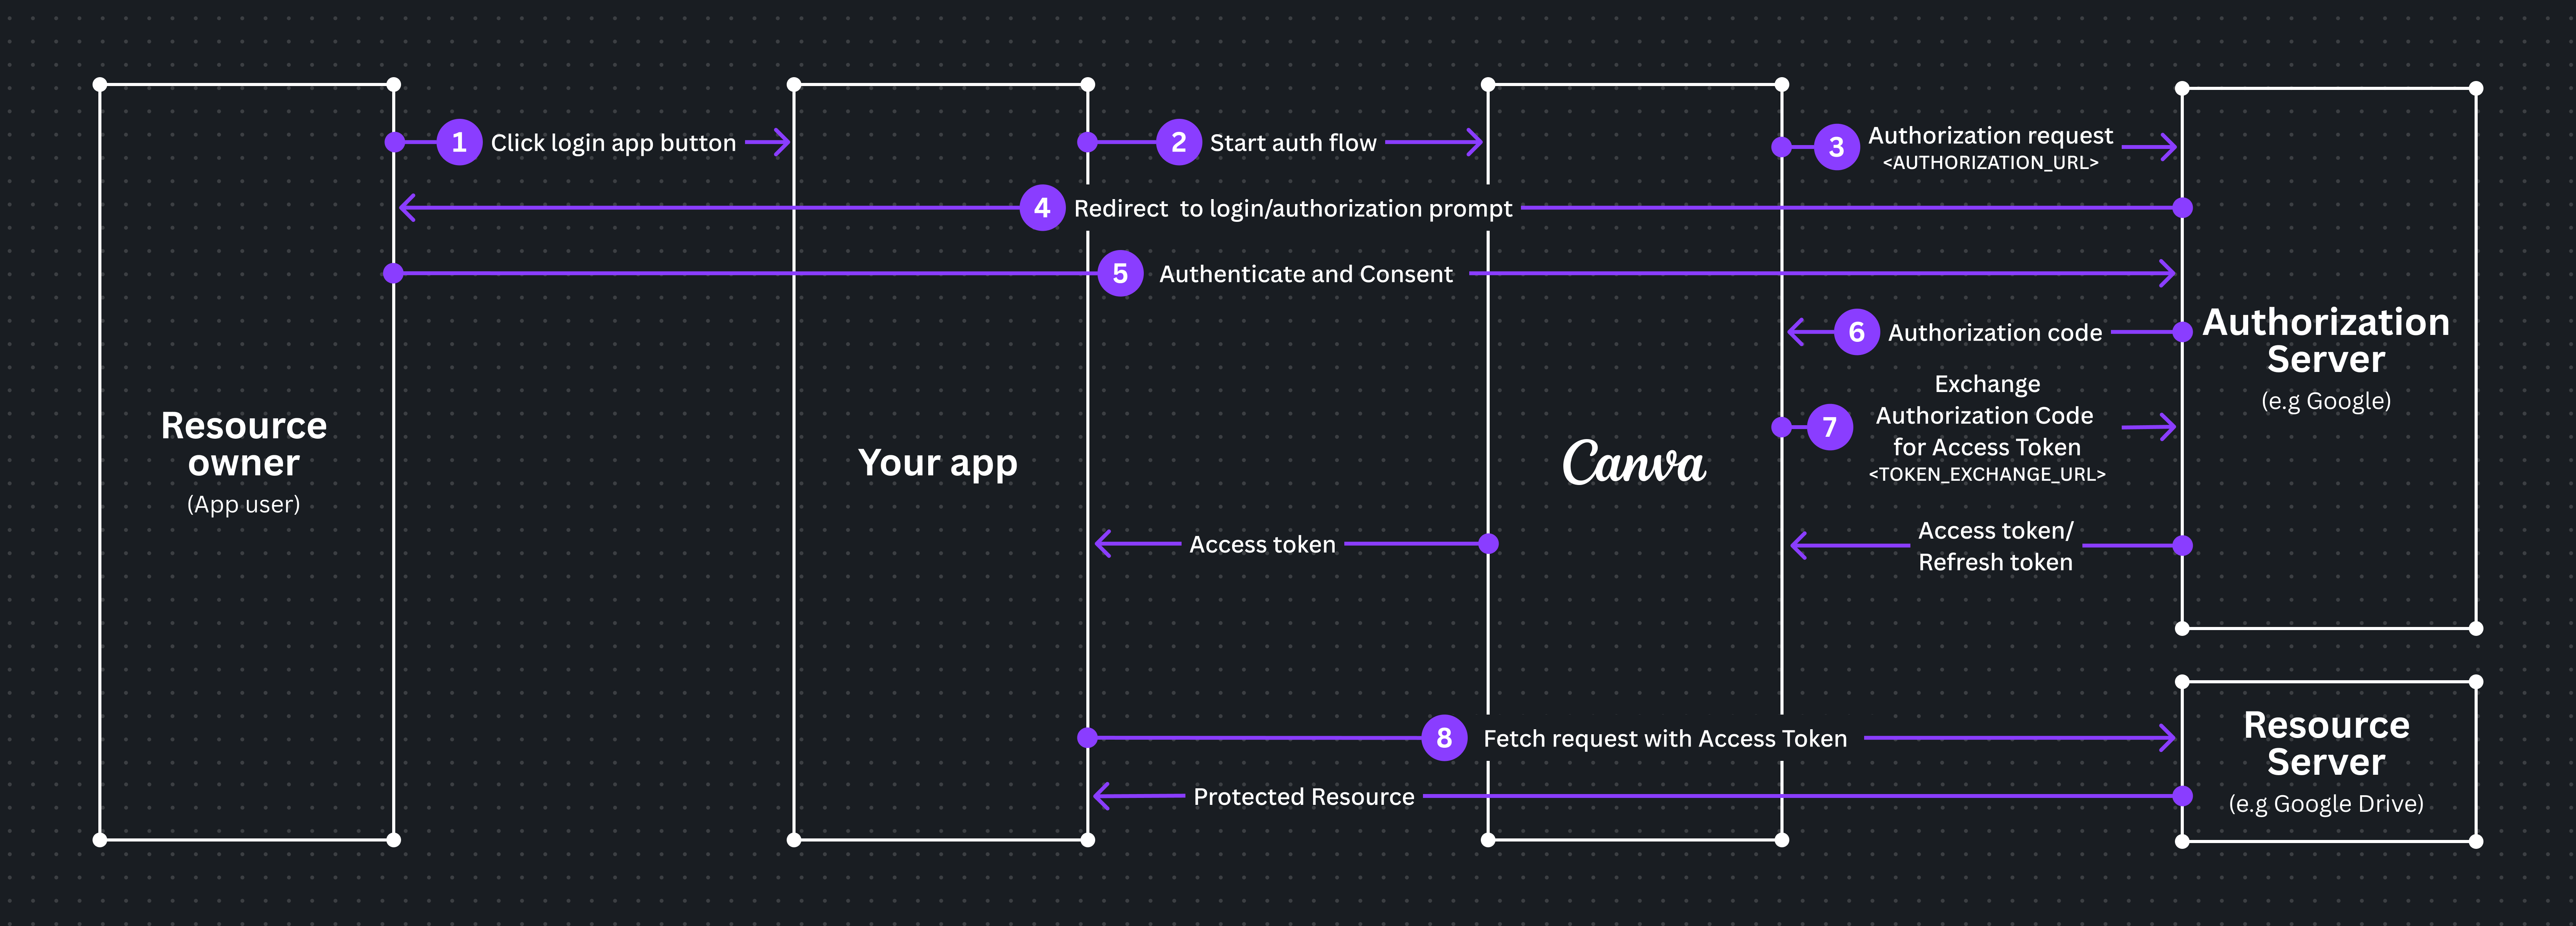
- User clicks the login button.
- The authorization flow begins.
- Canva generates the authorization URL, based on the configuration you provided in the developer portal. If your IdP supports PKCE, then Canva also generates a code challenge.
- A popup window opens for the authorization URL.
- User logs into the IdP and the popup window is redirected back to Canva by the IdP, using the redirect URI shown in the Developer Portal. This redirection must include the following:
- The state that Canva originally provided in the authorization URL.
- The authorization code generated by the IdP.
- Canva receives the authorization code.
- Canva retrieves the access and optional refresh tokens from the IdP, and if PKCE is enabled it also uses the code verifier. Some IdPs (such as Google) require additional configuration for the response to include the refresh token; if the refresh token isn't provided then the user must re-login to the app once the access token expires.
- Canva stores the access and refresh tokens.
- The popup window closes and the authorization flow concludes.
- Your app code requests a token using the
getAccessTokenauth API, and Canva returns the access token to the application.
- Your app then uses the access token to retrieve resources from the resource server.
- If a refresh token was provided, then Canva will automatically refresh the token when the access token expires or
forceRefreshis called.
- If a refresh token was provided, then Canva will automatically refresh the token when the access token expires or
Token endpoint request format
Canva calls your IdP's Token exchange URL directly. The request is a standard application/x-www-form-urlencoded HTTPS POST as defined in RFC 6749 §4.1.3(opens in a new tab or window). There's no additional encryption beyond HTTPS.
The exact format depends on the Credential transfer mode configured in the Developer Portal:
Headers (default)
Canva sends the credentials as an Authorization: Basic header, with the value Base64-encoded as <client_id>:<client_secret>, per RFC 6749 §2.3.1(opens in a new tab or window):
POST /oauth/token HTTP/1.1Host: auth.example.comAuthorization: Basic Base64(<client_id>:<client_secret>)Content-Type: application/x-www-form-urlencodedgrant_type=authorization_code&code=<authorization_code>&redirect_uri=<redirect_uri>
Body
Canva sends client_id and client_secret as body parameters:
POST /oauth/token HTTP/1.1Host: auth.example.comContent-Type: application/x-www-form-urlencodedgrant_type=authorization_code&code=<authorization_code>&redirect_uri=<redirect_uri>&client_id=<client_id>&client_secret=<client_secret>
Headers + Body
Canva sends credentials in both the Authorization: Basic header and as body parameters:
POST /oauth/token HTTP/1.1Host: auth.example.comAuthorization: Basic Base64(<client_id>:<client_secret>)Content-Type: application/x-www-form-urlencodedgrant_type=authorization_code&code=<authorization_code>&redirect_uri=<redirect_uri>&client_id=<client_id>&client_secret=<client_secret>
If PKCE is enabled, Canva includes &code_verifier=<code_verifier> as an additional body parameter in all request formats above.
Recommended practices
This section describes some recommended security practices for adding OAuth support to an app.
This is not a complete list of all the security hardening steps you would need to apply.
For a list of additional security responsibilities you'll need to consider for your app, see Shared responsibility model for Canva Apps.
Managing the access token lifecycle
- Canva manages the refresh and revocation of tokens on your behalf.
- If your IdP supplies a refresh token and an expiry then Canva will preemptively refresh access tokens before they become invalid. If your IdP supplies a refresh token but no expiry, Canva will assume that the token expires after a default period of time (90 days).
- To ensure that you always have an up-to-date token, always call
getAccessToken. There's no need to store or cache the token yourself or attempt to refresh the token. - If your IdP provides a token revocation endpoint, you should configure it in the developer portal to ensure that Canva can automatically revoke access to the IdP if the user's Canva account is deleted, the app is uninstalled, or when the user otherwise wants to log out of the app.
- If your IdP doesn't support refresh tokens, your user will be logged out when the token expires (provided Canva has the expiry, or the expiry is longer than 90 days) or the app will receive "unauthorized" errors from the resource server (if the expiry is shorter than 90 days).
- If you want to preemptively refresh an access token, or your IdP does not provide an expiry, you can forcefully refresh a token by calling
forceRefreshon thegetAccessTokenAPI.
Storing tokens
-
There's no reason to store the token, because Canva handles the caching for you. To ensure you always have an up-to-date token in a secure way, always call
getAccessToken. This method will not trigger a network request or a delay for your app, because Canva updates this value automatically. -
Web storage layers (such as
localstorage,cookieJar, andsession) are vulnerable to many forms of attacks that will compromise your users. For example, the risk to users of having their Google access token leaked can be devastating. -
There's no secure way to store a token in web storage.
Proof Key for Code Exchange (PKCE)
PKCE strengthens the OAuth flow by adding an extra layer of security, which helps ensure that access tokens are not intercepted by a malicious third-party. Not all IdPs support PKCE, but for those that do, Canva recommends keeping this feature enabled because the authentication capability takes the complexity out of using it by generating the code verifier for you.
- At the start of the OAuth flow, Canva generates a high-entropy cryptographic key called the
code_verifier. - Canva generates a
code_challenge— a SHA-256 hashed and Base64 URL-encoded version of thecode_verifier— and sends it to the authorization server in the initial authorization request. - After the user authenticates, Canva requests the access token by presenting the original
code_verifier. Before issuing an access token, the IdP compares the presented verifier with the previously supplied challenge, to ensure that they match.
Cross-Origin Opener Policy (COOP)
COOP affects Canva's OAuth flow when an application enforces same-origin or same-origin-allow-popups. These values isolate the browsing context from other origins. A same-origin or same-origin-allow-popups policy blocks Canva from accessing any authorization window properties using window.opener, preventing the OAuth flow from completing because the two windows can't communicate. Canva recommends reviewing your identity platform's COOP settings.
- If you own the identity platform where the user opens the authorization prompt, and you're enforcing COOP of
same-originorsame-origin-allow-popups, ask your security team about changing the COOP policy tounsafe-none. This policy allows the popup window to interact with the opener in a cross-origin setting. - If your app integration uses a third-party identity platform to enforce COOP of
same-originorsame-origin-allow-popups, contact your platform's support team to request changing the COOP settings.
Traffic between app and resource server
Note that https or wss requests are mandatory for all apps that communicate with external backends. This is enforced by each app's Content Security Policy (CSP). The https requirement helps ensure that sensitive data (such as tokens or user personally identifiable information (PII)) cannot be intercepted by third-parties.
However, URL parameters containing sensitive fields might be mistakenly logged. When possible, always include sensitive information in the headers or body of requests.
Separate IdPs
When using an Identity Provider (IdP), you must clearly distinguish between your production and development environments.
- Separate environments: Your production and development IdP environments must use separate environment settings, with different client IDs, secrets, and endpoints.
- User data: Don't use real user data in a development IdP.
- Logging: Your log files must not record sensitive information.
Revoking access
Review Canva's design guidelines for handling app disconnections and reconnections.
Canva can automatically request token revocation from the IdP, but only if you've configured the revocation exchange URL in the Developer Portal(opens in a new tab or window). For more information about the revocation setting, see Prerequisite: Configure Developer Portal.
If the revocation exchange URL is configured, Canva automatically requests token revocation in the following cases:
-
The user's Canva account is deleted.
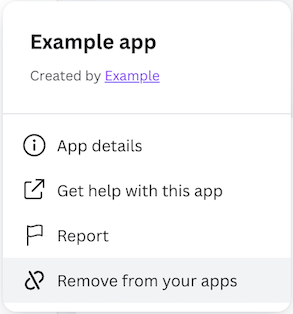
-
When the users clicks on Remove from your apps:
For information on manually requesting revocation of the refresh and access tokens, see the deauthorize function.
IdP configurations
Some IdPs (such as Google) will not automatically issue refresh tokens, and require additional configuration steps. To ensure a fluid experience for users, we highly recommend setting up IdPs to issue refresh tokens.
Reusing client configuration
Some IdPs (such as Google) organize authentication and access management on a project basis, instead of by individual clients or applications. This structure can make it tempting to use a single configured client across multiple apps for simplicity. When applied poorly, this approach can be an anti-pattern for the user experience. This is because reusing a client configuration across different apps can lead to confusion during the consent phase, where users see permissions requested under a single project name, instead of permissions being specific to the app they're currently using. This shared consent experience can be misleading and might not accurately represent the individual app's data access and usage, potentially eroding trust and clarity for the end user.
To ensure a transparent and app-specific consent process, developers are advised to avoid this pattern unless there's a well-justified reason that serves a clear benefit.
Dynamic IdP configurations
If your OAuth provider requires tenant-specific subdomains (for example, https://{workspace}.example.com/oauth/authorize), you can configure wildcard URL patterns to support multi-tenant setups. For more information, see Dynamic domains OAuth.
Add OAuth to your app
To help you add OAuth support to your app, the Apps SDK includes the following methods:
- auth.initOauth: Initializes the OAuth methods.
oauth.requestAuthorization: Checks whether the user has granted authorization to your app.oauth.getAccessToken: Retrieves the user's OAuth access token.
Prerequisite: Register with third party
Register your app with the third-party platform, also known as the authorization server. This procedure varies depending on the platform. For example, this process is described in the official Google documentation(opens in a new tab or window).
Prerequisite: Configure Developer Portal
Once you've registered your app with the authorization server, you should have enough information to configure the OAuth settings in the developer portal(opens in a new tab or window).
-
Locate your app in the developer portal(opens in a new tab or window).
-
In the left menu, click Authentication.
-
Complete the settings below:
- Provider: An identifier for your authorization server. If you configure multiple providers for your app, this field is used to distinguish between them.
- Client ID: A unique identifier for your app. Provided by the authorization server.
- Client secret: Allows the authorization server to verify your app's authenticity. Provided by the authorization server.
- Credential transfer mode: Determines how Canva sends your Client ID and Client secret to the authorization server when exchanging the authorization code for tokens. Choose the mode your authorization server supports:
- Headers (default): Sends credentials as an
Authorization: Basicheader. OAuth 2.0 compliant and supported by most providers. - Body: Sends
client_idandclient_secretas body parameters. Only select if your authorization server requires it. - Headers + Body: Sends credentials in both the header and body. Not recommended unless specifically required by your authorization server.
- Headers (default): Sends credentials as an
- Authorization server URL: The URL your users are directed to when logging in with your IdP. Provided by the authorization server.
- Token exchange URL: The endpoint Canva calls to retrieve access and refresh tokens after a user logs in. Provided by the authorization server.
- Redirect URL: A read-only field pre-filled by Canva. Use the Copy button to copy this value and register it with your IdP when setting up your OAuth app.
- Revocation URL (Optional): The endpoint Canva uses to revoke access and refresh tokens if a user uninstalls the app or is disabled by an admin. Provided by the authorization server.
- PKCE: Automatically enabled to improve security. Keep this on if your IdP supports it.
Step 1: Initialize OAuth
In your app, import the required libraries and initialize the OAuth method:
import { prepareDesignEditor } from "@canva/intents/design";import { auth } from "@canva/user";prepareDesignEditor({async render() {const oauth = auth.initOauth();// ... continue rendering UI},});
Initiating OAuth inside intents
Trigger OAuth requests from within your intent code.
import { auth } from "@canva/user";const oauth = auth.initOauth();const scope = new Set(["offline_access"]);// Avoid: runs as soon as the module loads, not in response to an intentawait oauth.requestAuthorization({ scope });
import { auth } from "@canva/user";import { prepareDesignEditor } from "@canva/intents/design";prepareDesignEditor({async render() {const oauth = auth.initOauth();const scope = new Set(["offline_access"]);await oauth.requestAuthorization({ scope });// ... continue rendering UI},});
import { auth } from "@canva/user";import { prepareDesignEditor } from "@canva/intents/design";prepareDesignEditor({async render() {const oauth = auth.initOauth();const scope = new Set(["offline_access"]);const App = () => {const login = async () => {await oauth.requestAuthorization({ scope });// handle response...};return <button onClick={login}>Login</button>;};// render <App /> with your framework},});
Per-action authorization in multi-step intents
Some intents expose multiple actions (for example, Content Publisher has getPublishConfiguration, renderSettingsUi, renderPreviewUi, and publishContent). Actions can be invoked at different times and contexts, so any action that needs to call your backend or a third‑party API should:
- Check for a valid token at the start of the action.
- If no token is available, initiate
requestAuthorizationfor that action and then proceed. - Avoid caching tokens yourself; always call
getAccessTokento read the latest token.
import { auth } from "@canva/user";import { prepareContentPublisher } from "@canva/intents/content";const scope = new Set(["offline_access"]);prepareContentPublisher({async getPublishConfiguration() {// No token required here unless your configuration endpoint is protectedreturn { status: "completed", outputTypes: [] };},renderSettingsUi() {const oauth = auth.initOauth();(async () => {await oauth.requestAuthorization({ scope });// Optional: get token if needed for API callsconst res = await oauth.getAccessToken({ scope });const token = res?.token ?? null;// Use token to fetch user resources (e.g., contact lists)})();},renderPreviewUi() {// No token required here unless your preview depends on protected resources},async publishContent(request) {const oauth = auth.initOauth();await oauth.requestAuthorization({ scope });const res = await oauth.getAccessToken({ scope });const token = res?.token ?? null;if (!token) {// Handle user declining/closing authorization (show UI or return an error)return { status: "app_error", message: "Authorization required" };}// Use token to publish to the user's accountreturn { status: "completed", externalId: "...", externalUrl: "..." };},});
Step 2: Create the state variable
Create a state variable to track the token and authorization status:
export const App = () => {const [accessTokenResponse, setAccessTokenResponse] = useState<AccessTokenResponse>(null)const isAuthorized = useMemo(() => accessTokenResponse !== null, [accessTokenResponse])const [isLoading, setIsLoading] = useState(true);
Step 3: Create the function
Create a function that fetches an access token from OAuth and then updates the state for the accessTokenResponse variable. This will check whether the user has authorized your app's access. If the user is logged in, it will return the token:
const retrieveAndSetToken = async () => {setIsLoading(true);try {const accessTokenResponse = await oauth.getAccessToken({ scope });setAccessTokenResponse(accessTokenResponse);} finally {setIsLoading(false);}};
Step 4: Check for existing token
Use the useEffect hook to trigger the retrieveAndSetToken function when the component loads; this will also attempt to fetch an access token:
useEffect(() => {retrieveAndSetToken();}, []);
Step 5: Start the workflow
If no token is found, start the OAuth flow by triggering oauth.requestAuthorization(). You can then retrieve and hold the user's access token in state using the retrieveAndSetToken function created above.
async function login() {const authorizeResponse = await oauth.requestAuthorization({ scope })if (authorizeResponse.status === "completed") {retrieveAndSetToken()}}}
Step 6: Show a confirmation message
If the user has granted authorization, show a confirmation message. Otherwise, show a login prompt.
return (<div className={styles.scrollContainer}><Rows spacing="2u">{isAuthorized ? (<Text>You are logged in</Text>) : isLoading ? (<Text>Loading...</Text>) : (<Button variant="primary" onClick={login}>Login</Button>)}</Rows></div>);
Step 7: Fetch data from an API using the access token
Once the user is authorized and you have an access token, you can use it to make authenticated requests to your API or a third-party API.
const fetchData = useCallback(async () => {const accessToken = accessTokenResponse?.token;if (!accessToken) {return;}try {const res = await fetch(BACKEND_URL, {headers: {Authorization: `Bearer ${accessToken}`,},});const data = await res.json();setResponseBody(data);} catch (error) {setError(error instanceof Error ? error.message : "Unknown error");}}, [accessTokenResponse]);
(Optional) Step 8: Handle expired access tokens
If the IdP provides Canva with expiry times of access tokens, Canva will automatically handle the refreshing of those tokens.
If the IdP doesn't provide Canva with expiry times, Canva will treat the token as if it is expired after a default period of time (90 days).
If the token expires before this time, your app will need to forcefully refresh expired tokens by setting forceRefresh to true in the getAccessToken method.
Enabling forceRefresh will either:
- Refresh the access token
- Force the user to re-authenticate if a refresh token isn't available
For example:
const res = await fetch(BACKEND_URL, {headers: {Authorization: `Bearer ${accessToken}`,},});if (!res.ok && res.status === 403) {await retrieveAndSetToken({ forceRefresh: true });setError("Access token expired, please try again");return;}const data = await res.json();setResponseBody(data);
const retrieveAndSetToken = async ({ forceRefresh = false } = {}) => {try {setIsLoading(true);const accessTokenResponse = await oauth.getAccessToken({ scope, forceRefresh });setAccessTokenResponse(accessTokenResponse);} finally {setIsLoading(false);}}
Ensure refresh tokens are issued (offline access and consent)
Some providers (for example, Google) require explicit query parameters to return a refresh token consistently. When starting the authorization flow, pass the following parameters:
const queryParams = new Map([["access_type", "offline"],["prompt", "select_account"],]);await oauth.requestAuthorization({ scope, queryParams });
These ensure the refresh token is returned and persisted, and help avoid short-lived access tokens expiring too quickly. Consult your IdP's documentation for any provider-specific nuances.
Example code
This example is the complete code from the above tutorial.
import { useEffect, useState, useMemo, useCallback } from "react";import type { AccessTokenResponse, Oauth } from "@canva/user";import { auth } from "@canva/user";import {AppUiProvider,Text,Title,Button,Rows,FormField,MultilineInput,} from "@canva/app-ui-kit";import { createRoot } from "react-dom/client";import { prepareDesignEditor } from "@canva/intents/design";import * as styles from "styles/components.css";const scope = new Set(["openid"]);const BACKEND_URL = `${BACKEND_HOST}/custom-route`;function DesignEditorApp({ oauth }: { oauth: Oauth }) {const [accessTokenResponse, setAccessTokenResponse] =useState<AccessTokenResponse>(null);const [error, setError] = useState<string | null>(null);const isAuthorized = useMemo(() => accessTokenResponse != null,[accessTokenResponse]);const [isLoading, setIsLoading] = useState(false);const [responseBody, setResponseBody] = useState<unknown | undefined>(undefined);const retrieveAndSetToken = async ({ forceRefresh = false } = {}) => {try {setIsLoading(true);const accessTokenResponse = await oauth.getAccessToken({ scope, forceRefresh });setAccessTokenResponse(accessTokenResponse);} finally {setIsLoading(false);}};useEffect(() => {retrieveAndSetToken();}, []);const login = async () => {setError(null);const authorizeResponse = await oauth.requestAuthorization({ scope });if (authorizeResponse.status === "completed") {retrieveAndSetToken();}};const fetchData = useCallback(async () => {setError(null);const accessToken = accessTokenResponse?.token;if (!accessToken) {return;}try {const res = await fetch(BACKEND_URL, {headers: { Authorization: `Bearer ${accessToken}` },});if (!res.ok && res.status === 403) {await retrieveAndSetToken({ forceRefresh: true });setError("Access token expired, please try again");return;}const data = await res.json();setResponseBody(data);} catch (error) {setError(error instanceof Error ? error.message : "Unknown error");}}, [accessTokenResponse]);return (<div className={styles.scrollContainer}><Rows spacing="2u">{error && (<Rows spacing="2u"><Title>Authorization error</Title><Text>{error}</Text><Button variant="primary" onClick={login}>Try again</Button></Rows>)}{isAuthorized ? (<><Text>You are logged in</Text><Button variant="primary" onClick={fetchData}>Fetch data</Button>{responseBody ? (<FormFieldlabel="Response"value={JSON.stringify(responseBody, null, 2)}control={(props) => (<MultilineInput {...props} maxRows={5} autoGrow readOnly />)}/>) : null}</>) : isLoading ? (<Text>Loading...</Text>) : (<Button variant="primary" onClick={login}>Login</Button>)}</Rows></div>);}prepareDesignEditor({render: async () => {const rootElement = document.getElementById("root");if (!(rootElement instanceof Element)) {throw new Error("Unable to find element with id of 'root'");}const root = createRoot(rootElement);const oauth = auth.initOauth();root.render(<AppUiProvider><DesignEditorApp oauth={oauth}/></AppUiProvider>);},});
API reference
For more information about the API, see auth.initOauth.
Key terms
Term | Definition |
|---|---|
Authorization Server | Authenticates the resource owner (typically the user), and grants or denies requests from client applications to access the user's resources on the resource server. |
Client Identifier (or Client ID) | A unique string assigned to a client application by the authorization server. This is used to identify the client during the authorization process. Defined in RFC6749 - section 2.2(opens in a new tab or window) |
Client Secret | A secret known only to the client and the Identity Provider (IdP). When combined with the client ID, it effectively creates a username and password for the client. Lets the authorization server identify the authenticity of the client (not the individual user). Defined in RFC6749 - Section 2.3.1(opens in a new tab or window) |
Authorization Code | The client receives the authorization code from the authorization server. To obtain this, the client sends the resource owner to the authorization server, through their web browser. The authorization server then redirects the resource owner back to the client, along with the authorization code. Defined in RFC6749 - 1.3.1(opens in a new tab or window) |
Identity Provider (IdP) | A service that authenticates users and issues tokens. In the context of Canva's OAuth integration, your IdP is the service that your users log into (for example, Google, Okta, or your own authentication server). Canva communicates directly with your IdP to complete the OAuth flow. |
PKCE (Proof Key Code Exchange) | Improves security for clients by mitigating authorization code interception attacks. Defined in RFC7636(opens in a new tab or window). |
Resource Server | The server that hosts the protected resources your app wants to access (for example, a Google Drive API or your own API). Once your app has an access token, it uses it to make requests to the resource server. |