Real-time Collaboration
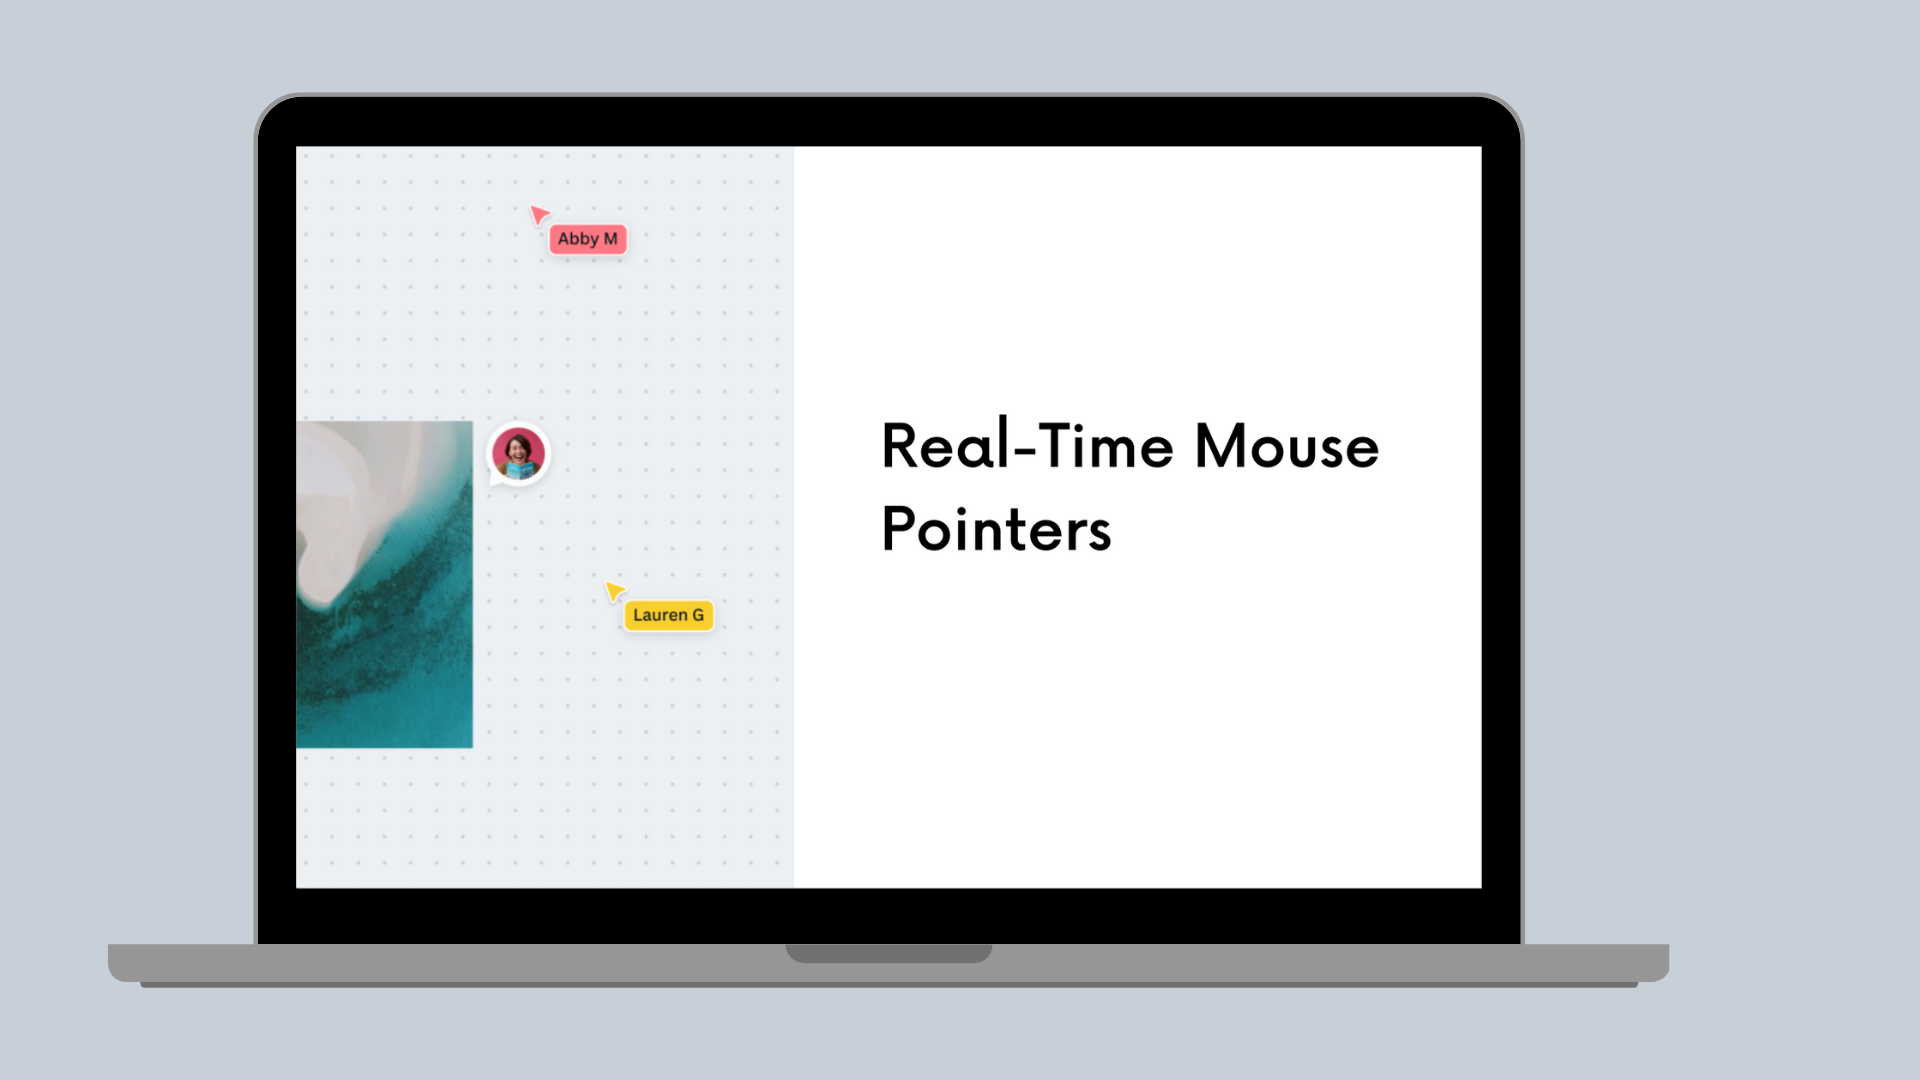
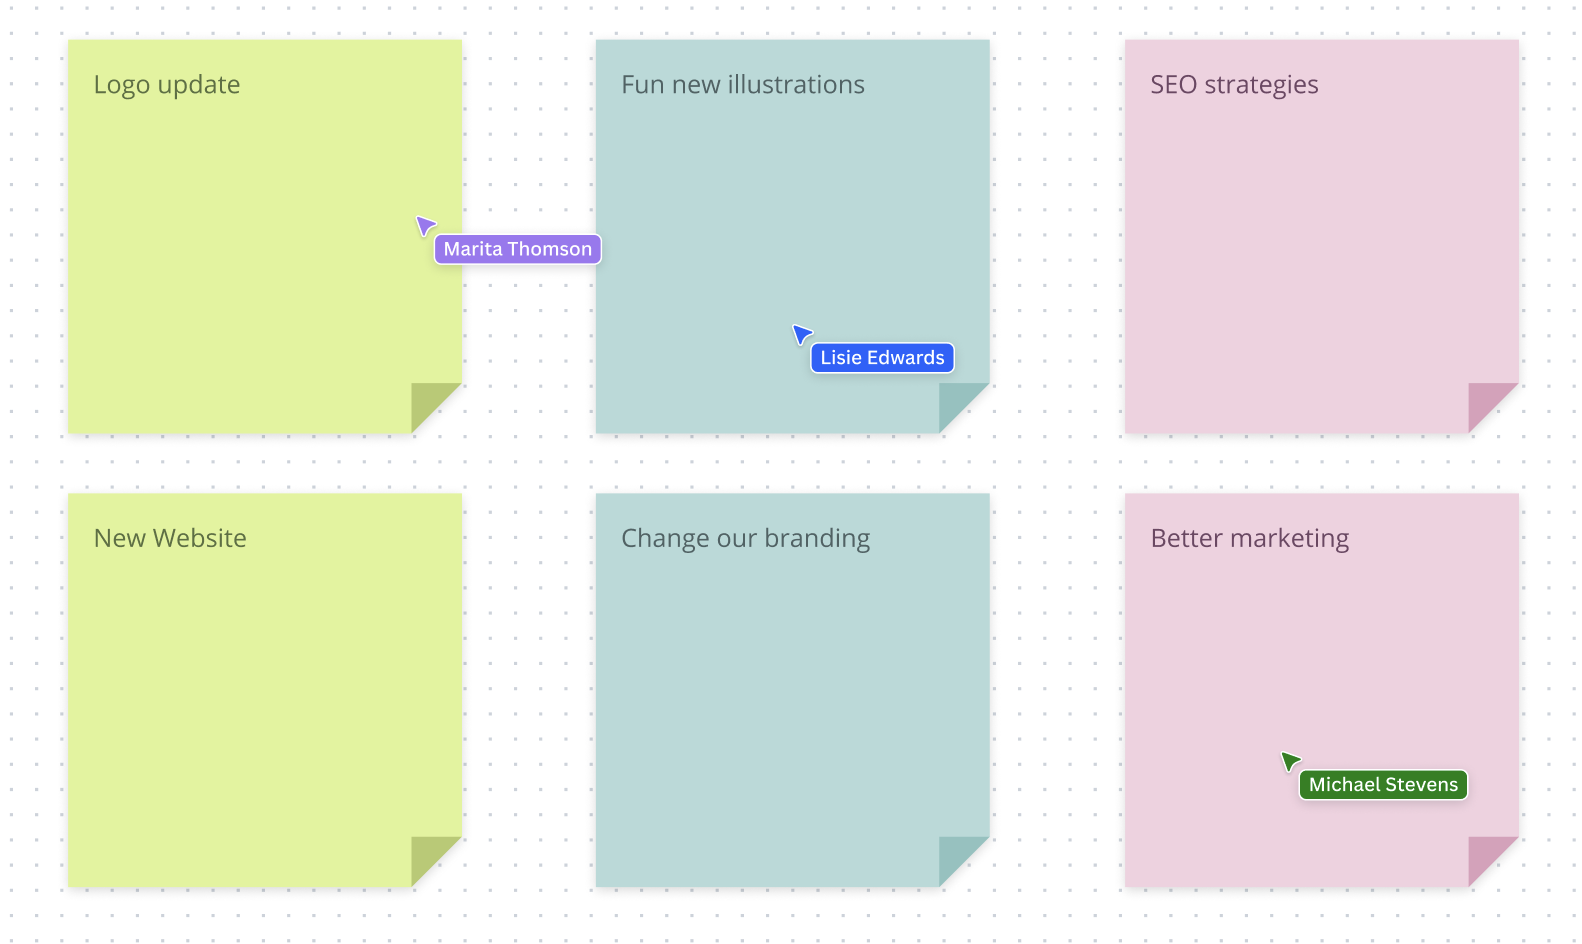
Real-time mouse pointers
Our journey to implement and support real-time mouse pointers.
Hi, my name is Anton and I’m from the Collaboration team at Canva. I’d love to share our team’s experience of enabling users to see each other’s mouse pointers in real time and scaling this feature to support 1M users.
In 2020, Canva had a goal to release a whiteboard product as part of our visual suite. A whiteboarding experience is useful for collaborative brainstorming sessions. A big part of the online brainstorming experience is the interactivity and the presence of the other people around you, just like in an offline meeting room where everyone gathers around the whiteboard. One of the features adding to the real-time presence is real-time mouse pointers. The mouse pointers allow users to point to the areas of the design they’re talking about or understand where other people are working on a big whiteboard.
Project milestones
The main challenge with this feature is the reliability and complexity of the infrastructure that can support the load of all users sending the mouse pointer positions simultaneously. To deliver the feature quickly, we decided to start with a basic solution and use it for technical exploration and prototyping while building the long-term solution.
We looked into the experience offered by other collaborative whiteboarding tools and, based on this, came up with the requirements for the desired update rate of the mouse pointer positions. We set a goal to support 3 updates per second for each user for up to 50 users on a single design.
There are existing features in Canva that implement real-time interactions between users, notably real-time design editing. The Canva Editor uses websockets and the Redis database to store and propagate the design changes to users editing the same design in real time. For more information about the infrastructure that supports millions of simultaneous WebSocket connections, see Enabling real-time collaboration with RSocket.
For the first milestone, we chose a similar architecture for the real-time mouse pointers. We'd already gained a lot of experience using and maintaining a Redis cluster, and there was a prior art of building real-time interactions using the combination of websockets and Redis.
However, the ideal solution would allow the exchange of the mouse pointer positions directly between the clients, avoiding the roundtrip to the server. It would reduce the latency between the clients, reduce the load on the Canva backend servers, and reduce costs. The WebRTC technology matches these requirements and we chose it for the second milestone and a final, long-term architecture for the project.
The following sections describe both of these solutions and outline the most interesting technical parts that allowed us to build a horizontally scalable infrastructure.
Milestone 1. Backend-centric architecture
As mentioned, the main technologies are the websockets used to exchange data between the user and the Canva backend instance. We used the Redis database as a message broker routing data between the stateless microservice instances. We chose Redis for message passing over other technologies because we had the prior knowledge and infrastructure for this use case.
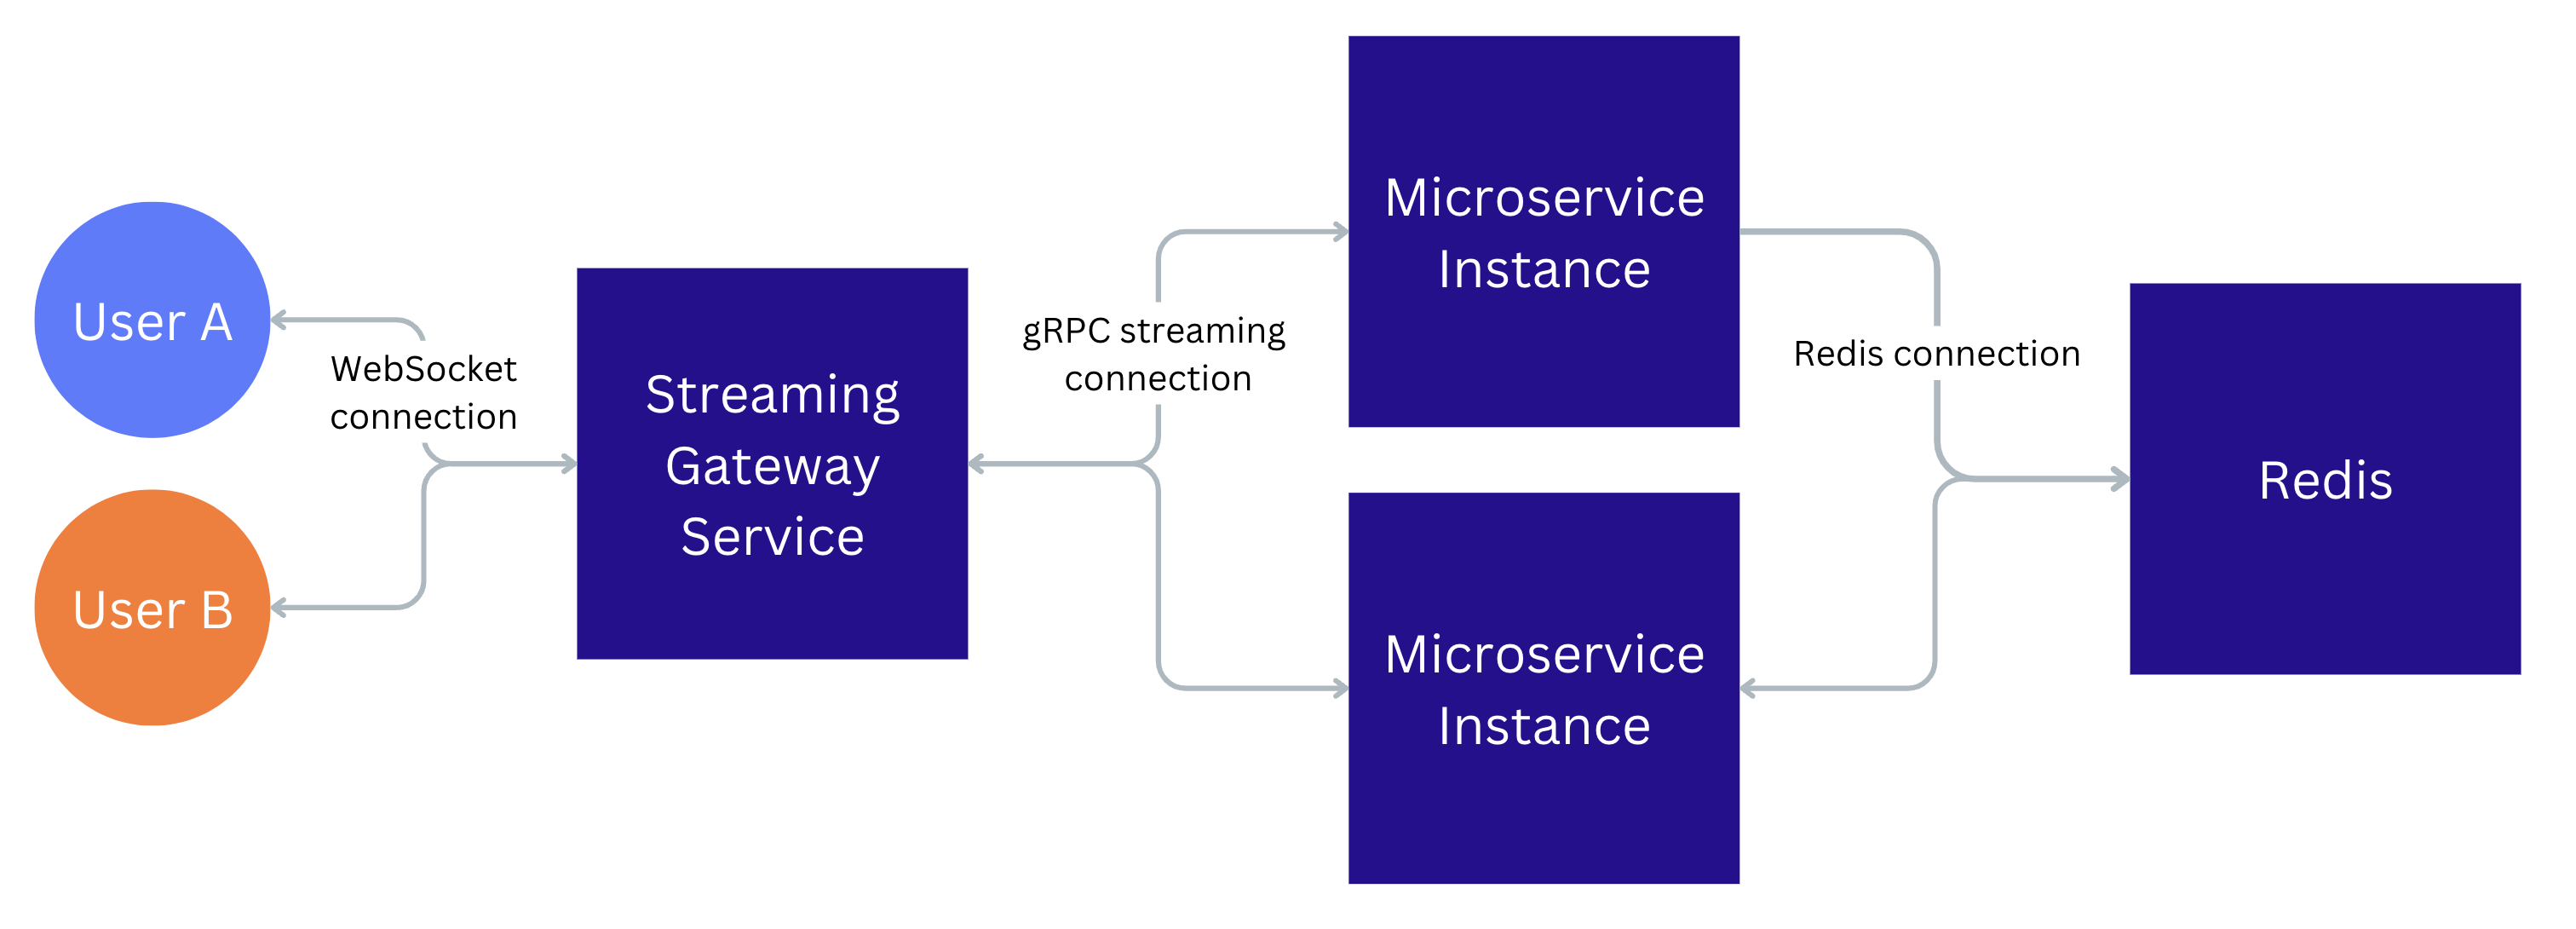
We can easily scale horizontally the number of server instances. When a new backend instance spins up, all new WebSocket connections are routed to the new instance until the number of connections on it is roughly the same as on all other instances. This load-balancing strategy ensures that the number of connections stays the same across all backend instances and the backend instances are not overloaded.
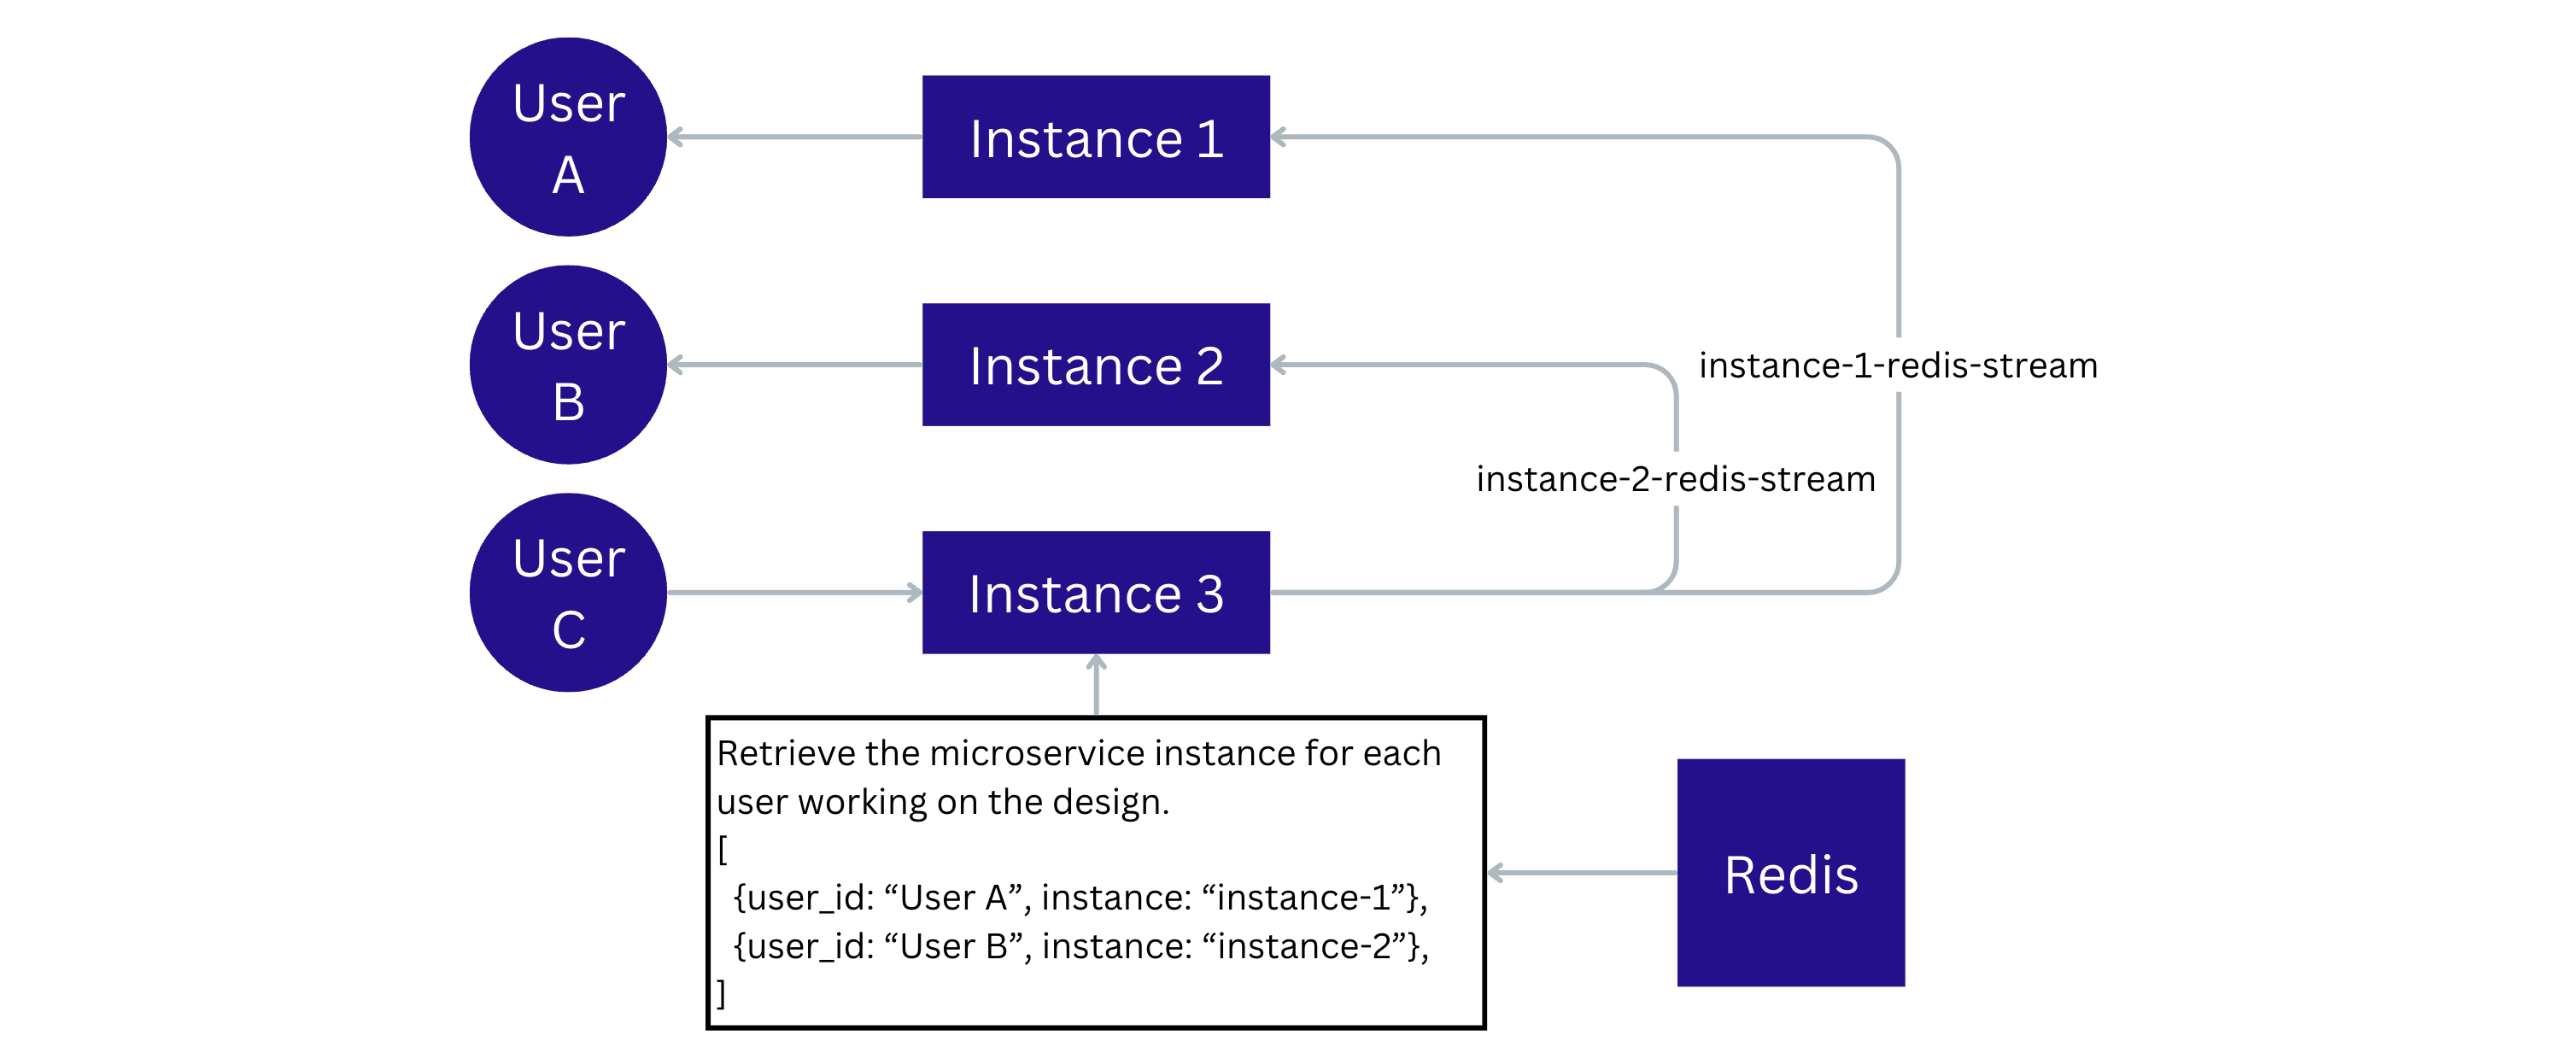
The main complexity of the engineering design lies in the communication plane between the server instances and Redis. How do we pass the mouse pointers from one server to another at scale? Ideally, users collaborating on the same design would connect to the same server instance, and the server would route messages in-memory. Unfortunately, we didn’t have a way to maintain the affinity between the connections and the server. At the same time, Redis provides a good way of sharing memory between the stateless microservices.
Redis has 2 ways of propagating messages, similar to the message queues: Redis Streams and PubSub. Streams provide better delivery guarantees but require the Redis clients to actively poll for new messages. PubSub messages are pushed to the subscribed Redis clients and not saved in Redis' memory. PubSub messages are lost if the connection between the server and Redis breaks.
In the end, we used both Redis Streams and PubSub. We used Streams for the data related to the session control information, such as notifying that a new user connected or disconnected. This information needs better delivery guarantees than regular mouse position updates. Streams also lets us ensure messages aren’t lost if the backend service loses the Redis connection. After the backend service reconnects, it can still read the messages it missed while offline.
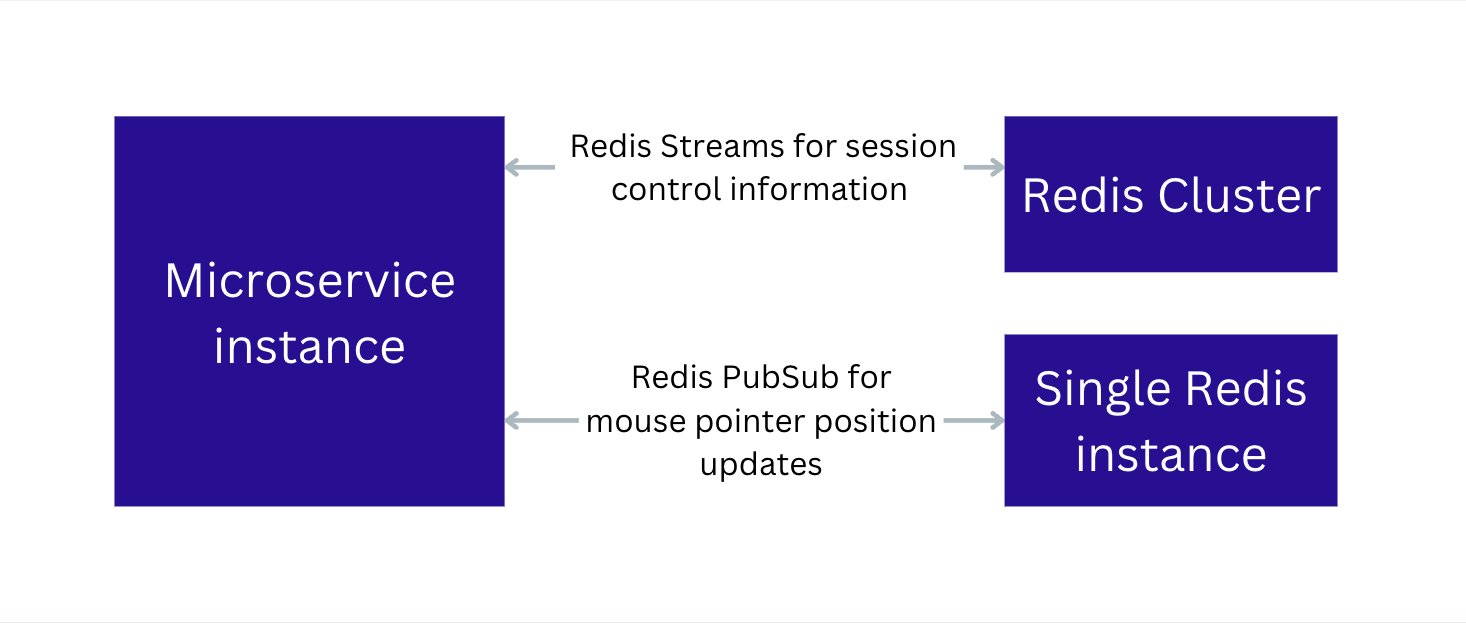
Each microservice instance has a Redis Stream entry assigned to it. Only that instance can read from it, and all other services can only write to it. This model ensures that the instance receives only messages related to the users who’re connected to it. This is achieved by keeping track of which user is connected to each backend instance.
When a client connects to the microservice instance, an entry is added to the design session information with the instance ID. The senders check the content of the session information and send the data only to the instances with the clients connected to them.
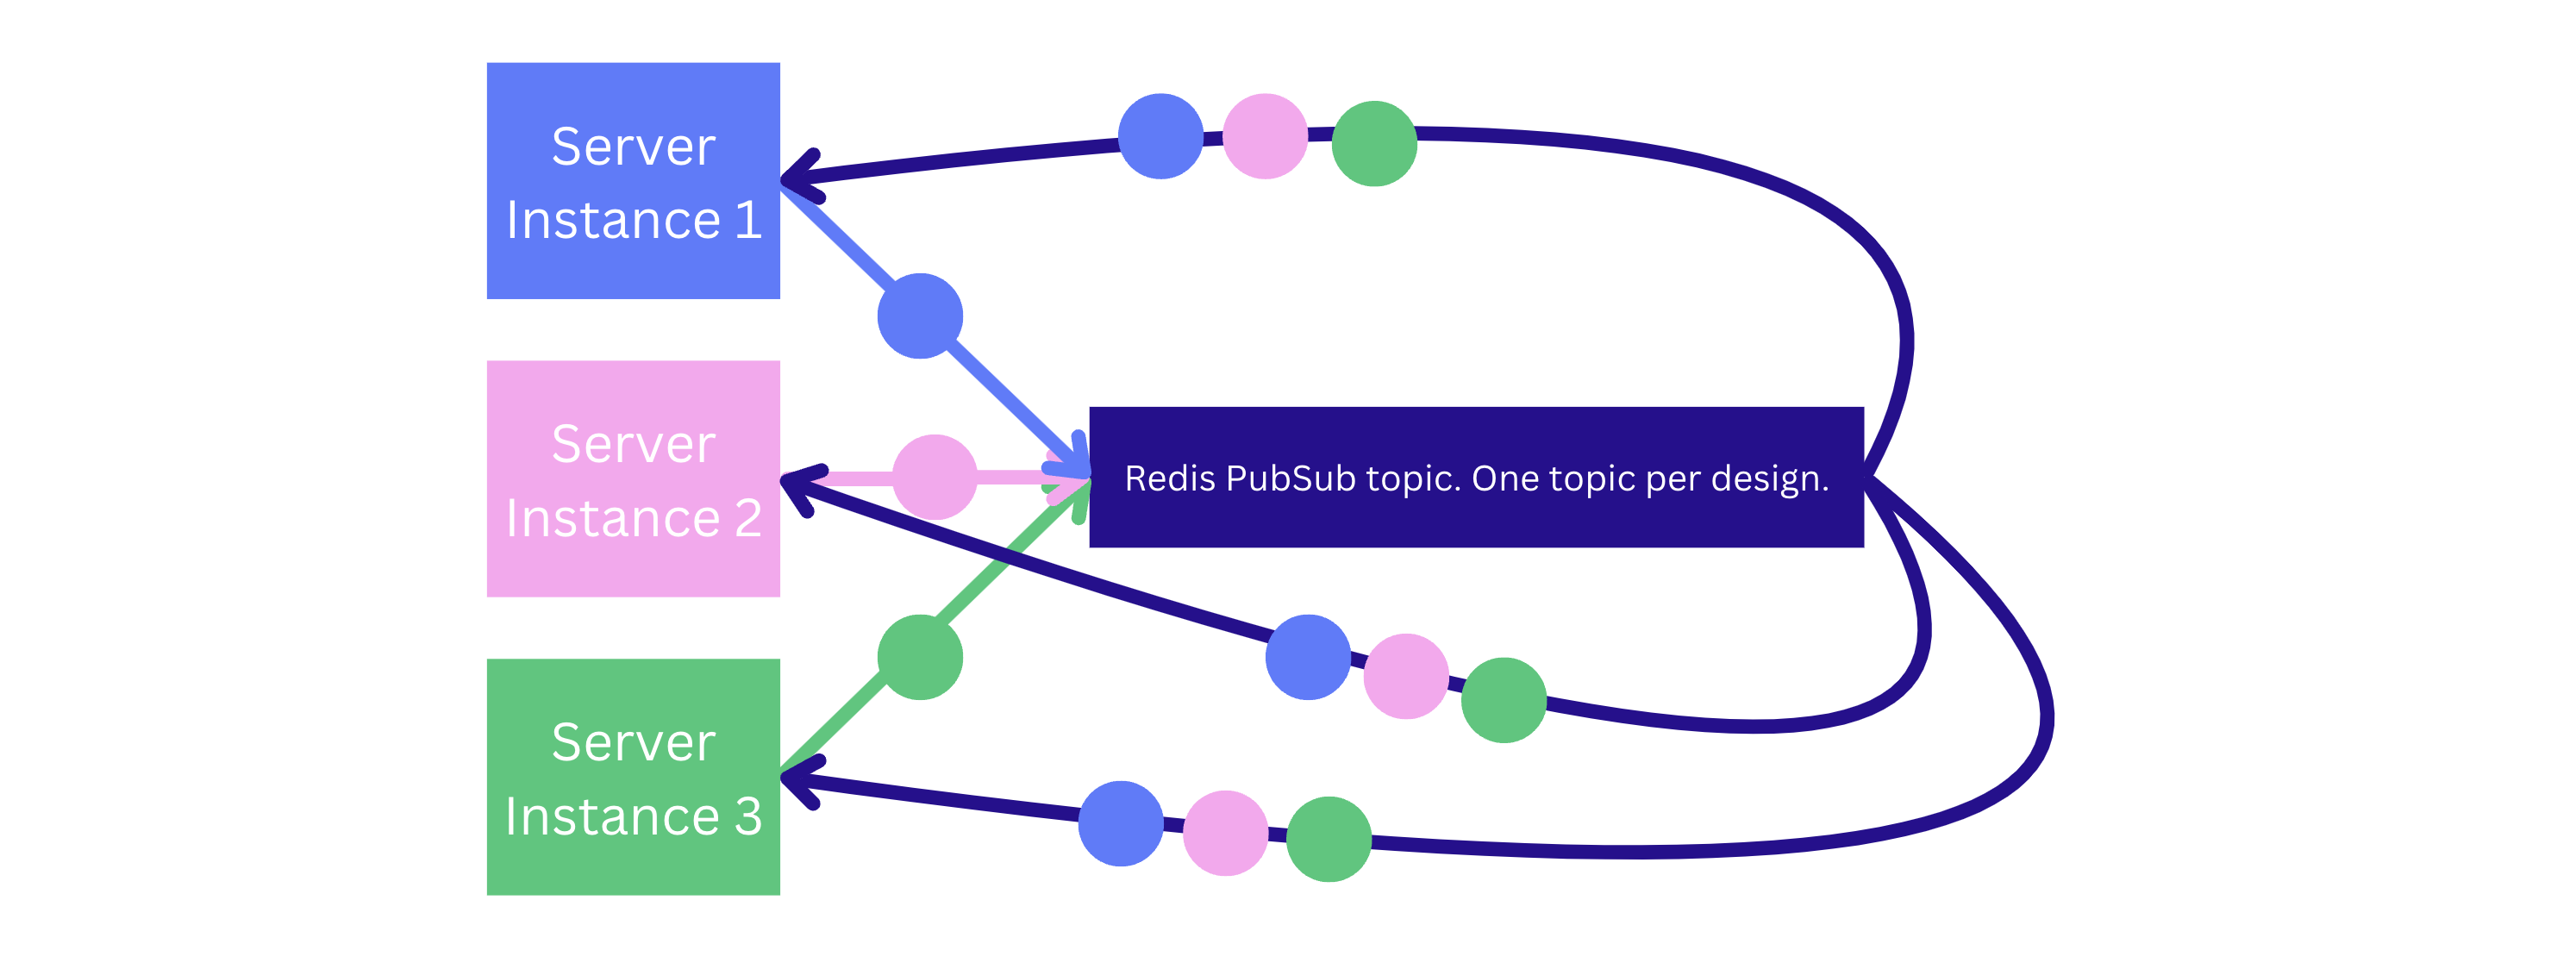
We pass the mouse pointer position updates that make up most of the traffic through the PubSub channels. Each server instance has a single Redis connection dedicated to the PubSub messages. When a new client connects to the server, the server subscribes the PubSub connection to the messages related to that document.
This architecture successfully scaled to 100% of users in the collaborative editing sessions without any performance issues. It supported hundreds of thousands of simultaneously connected clients and a throughput of approximately 100,000 mouse position updates per second. On peak, CPU utilization was 27% on a single Redis instance.
Learnings
While implementing this architecture, we learned some interesting things. You might find them helpful if you build a distributed event-driven system using the Redis database.
Redis PubSub scaling - sometimes less is more
When we built the mouse pointers, the latest Redis release was 6.2, which didn't support sharded PubSub commands. Support for sharded PubSub was added in version 7.0, meaning that in the cluster setup in version 6.2, PubSub messages are propagated to each cluster node. This means that PubSub doesn’t scale horizontally by adding more nodes in the Redis cluster. The throughput of the cluster decreases with the number of nodes.
Initially, we used the Redis cluster because of its higher availability and ability to scale horizontally. Eventually, we had to spin up an additional Redis instance consisting of a single node specifically for PubSub messaging. A single m6g.8xlarge instance was enough to handle the mouse pointer updates from all Canva users.
Load balancing WebSocket connections
A problem we needed to solve was the disruption that the daily deploys caused to the backends. Each time a new deployment happens in Canva, we stop the server instances running the previous version and move the traffic to the newly created server instances. With the streaming connections, the connections are closed and the clients reconnect to the servers running the new code version.
The load balancer balances the connections to the least loaded instance of the service, which works great if the cost of establishing a new connection is small because it makes sure that the connections rebalance quickly. In our case, however, it creates a problem of uneven load on the services during service restarts. Establishing a new connection costs more than maintaining an existing connection. If all new connections are routed to a newly spun-up instance, it puts that instance under much more load than an already running instance with a stable number of connections.
We’ve worked on improving and reducing the operations required when establishing the WebSocket connection on the backend. This was enough to prevent the overload of a single instance, even without changing the least-loaded load balancing strategy.
Binary serialization
Another optimization that decreased the CPU consumption on the instances was using binary encoding for the mouse pointer messages. Using binary protobuf encoding instead of serializing the messages into JSON decreased CPU load on the backend instances by 30%.
Redis client flushing
We use the Lettuce library to connect to Redis. This library uses Redis pipelining by default, but it still flushes every command as soon as it’s issued. By disabling auto flushing and batching the Redis PubSub commands by flushing them manually within a given time interval, we observed a 30% reduction in the Redis CPU consumption.
What’s next?
The previously outlined architecture can support the traffic users generate at a web scale of hundreds of thousands of simultaneously connected users. However, we’d like to support position updates at a rate greater than 3 per second for a smoother UX (ideally, increasing it to 60 updates per second). Unfortunately, with 60 updates per second, we couldn't use the single Redis instance. To support the 20x load increase, we’d need to change the architecture to send the messages directly between clients. We decided to go with the WebRTC technology, which allows transferring data directly between the user agents and is well supported across the industry.
Milestone 2. WebRTC implementation
WebRTC (Real-Time Communication in Browsers) allows you to create a peer-to-peer connection between 2 clients for sending and receiving audio, video, or generic data. It already has good support and stability in all major browsers, letting us adapt it to our needs. As a highly responsive feature, mouse pointers are an ideal WebRTC use case.
WebRTC was originally intended for video and audio communications, but it also has a data API allowing us to share information about mouse pointers.
The peer-to-peer communication simplifies the architecture and reduces the load on the backend by bypassing the server. WebRTC can use UDP and TCP protocols (WebSockets use only TCP). The peer-to-peer architecture improves the responsiveness of the real-time features by reducing the latency between two clients. However, using WebRTC increases the code complexity of the frontend clients.
WebRTC architecture overview
Creating a connection using WebRTC involves 3 major components:
- Clients: WebRTC browser API and frontend code to manage the connections.
- STUN/TURN servers: To receive client IP addresses and set up NAT traversal.
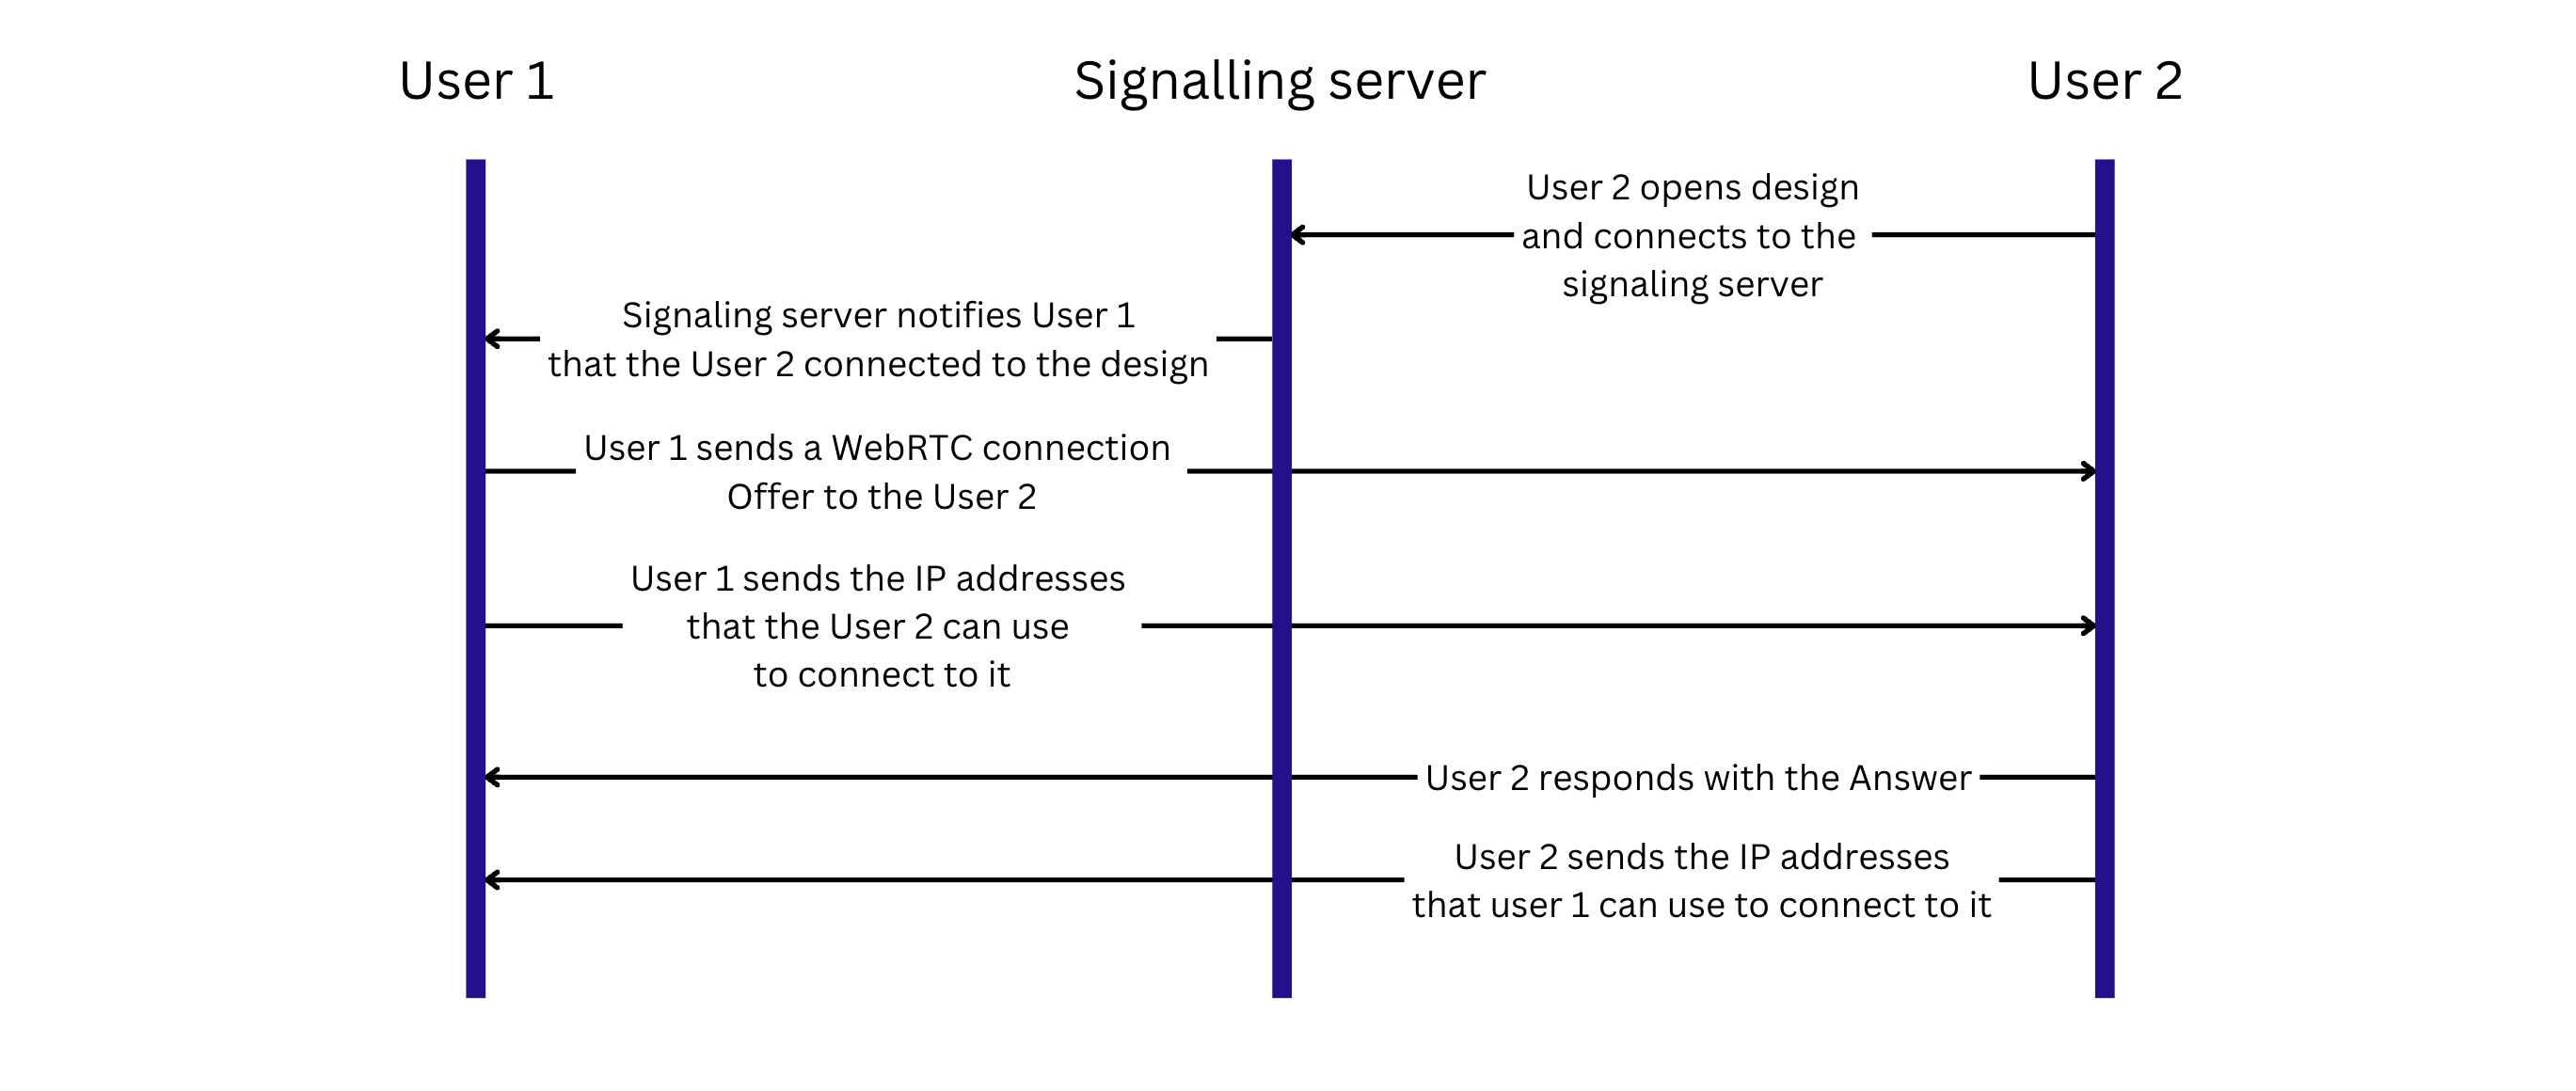
- Signaling server: To exchange client metadata before they establish a peer-to-peer connection.
We already had a WebSocket solution that we could easily adapt for signaling purposes. Many off-the-shelf signaling services are available. However, we decided to use our own infrastructure built for Milestone 1 as a signaling service. It allowed us to have fine-grained control over establishing a WebRTC session and reuse the access control logic specific to the Canva designs.

Establishing a connection between 2 clients consists of the following steps:
- Client A (the initiator) creates an offer Session Description Protocol (SDP) containing information about the session and codex and sends it through the signaling server to Client B.
- When Client B (the receiver) gets an offer, it creates an answer SDP and sends it through the signaling server to Client A.
- At the same time, both clients gather Interactive Connectivity Establishment (ICE) candidates from STUN servers, prioritizing each and sharing them through the signaling server.
- The WebRTC browser implementation builds the ICE candidate pairs, choosing the best one and uses it to establish a peer-to-peer connection.
WebRTC connections are established from each user to all other users working on a design (mesh topology). If 10 users work on the same design, each establishes 9 connections to all other users. WebRTC also supports other data exchange architectures, such as Selective Forwarding Unit (SFU) and Multipoint Control Unit (MCU). Their benefits include fewer connections and traffic for each client, an important consideration for real-time video conferencing. We chose the mesh architecture because it puts the lowest load on the backend.
Our frontend architecture already has information about the available clients in a session. When a new client joins a session, it acts as an initiator for all other clients in the session.
We’re tracking clients in the session and the RTC connection statuses to manage the connectivity. For example, there might be a situation when a client leaves a session, but the information about it isn’t updated yet, or the RTC connection might be disconnected. Based on the combined information, we could initiate reconnection, postpone it (for example, if a user goes offline and we need to wait until they get online again), or terminate the connection.
Data channel
Besides media streams, WebRTC supports the SCTP data channel interface, which can be opened on the connection and allows sending and receiving data in String or binary formats. This works well for us, and we can now send the mouse pointer positions we share with the WebSocket solution through the WebRTC data channel.
Data channels support ordered or unordered messages and reliable and partially reliable transports, simplifying the code that handles the messages. However, it has overheads, and for connections through the TURN service, we have to control the volume of messages so it doesn’t overload the servers.
The protocol uses a 2-way handshake to open a data channel. To keep the channel open, it periodically sends ping messages, adding extra overhead, and we must carefully control the number of active connections.
TURN versus P2P connections
The ICE candidate represents the client's transport address. When establishing the WebRTC connection, a client sends its ICE candidates to all other clients, letting them know how they can connect to it. The ICE candidate could have the following types:
- Host: When the address is directly attached to the client.
- Reflex: When the address relates to the public side of a NAT.
- Relay: When the address is allocated from the TURN server.
If both clients can share the host-type ICE candidates, they can create a P2P connection, which is ideal because it provides the best latency and doesn’t require an intermediate server.
If clients fail to create a direct connection (for example, if one or both clients are behind a symmetric NAT), WebRTC uses relayed candidates, which connects clients through the TURN server.
WebRTC collects all available ICE candidates from both clients and finds the pair with the best priorities (priorities are set based on various parameters, including the connection type).
Roughly 50% of connections use the TURN server. Plenty of online services provide the TURN servers and charge for the traffic, and it’s easy to integrate them into your application. We went with a third-party service, so we didn’t have to build and support the TURN servers ourselves. There are also open-source solutions for TURN servers, like Coturn, which you could consider if you want to run your own TURN server.
Problems solved during the rollout
The following sections describe the problems we solved during the rollout.
Migration from the WebSocket solution
Before rolling out the WebRTC to all users, we decided to test it on a smaller portion of users. This helped us measure if the editor experienced a performance hit and how much traffic passed through the TURN servers.
During the partial rollout, users using the WebSocket and WebRTC channels for mouse pointers might have been connected to the same design. We had to combine both solutions and simultaneously support the display of mouse pointers from both sources.
We’re prioritizing peer-to-peer connections, and because we’re tracking all active clients in the session, we know which clients successfully opened the WebRTC channel. If the client fails to open the WebRTC channel with at least one other active client in the session, we’re activating a fallback WebSocket channel to share updates with those clients. All the messages include the sender’s client ID. For those clients that open the WebRTC channel, all the received messages are taken from there and ignored from the WebSocket channel. The update from the client is sent to both channels, so all clients, regardless of which solution they are using, receive an update.
To simplify the migration, we created an abstraction over the WebRTC API that provided the same API as the WebSocket solution. This allowed us to fully reuse the existing code of the mouse pointers and easily switch between 2 transports.
Support for older browsers
WebRTC is a relatively new API, and even though it already has pretty good browser coverage, we still support some older browsers that don’t support certain methods or events.
The major part of the API is widely supported, and it's mostly related to edge cases. Sometimes, we have to trigger the reconnection to apply the update because of missing APIs. Existing open-source solutions like adaptor.js help with cross-browser implementation.
Connection collisions
As mentioned previously, when a new client joins a design, they act as initiators to other clients and send them an offer.
It could happen that 2 clients send an offer to each other, for example, if they’ve joined approximately at the same time. To resolve this issue, we follow the first-come, first-serve rule. Each client assigns a random ID to the offer they send, and the offer with the lower ID wins. If this happens, the other client terminates the connection they initiated and uses the one from the first client.
Manage connection statuses
During the session, a connection could be lost or terminated, or we might need to update any configuration. When any of this happens, both clients should appropriately handle it.
We have a complex logic to control all connection status events and validate the information we share. If any configuration or information changes, it’s sent through a signaling channel to the clients, and they generate a new SDP. All ICE candidates and connections have to be set up accordingly. Sometimes, we could have incorrect SDP or ICE candidates, for example, because of delays or message mis-orders. If this happens, we log it and save the data to handle the order or trigger a reconnect if needed.
Mostly, we prioritize the initiator in managing the connection status to avoid extra collisions.
Conclusion
Websockets and WebRTC technologies are both excellent options for real-time presence features. Using the combination of WebSockets and a message broker or an in-memory database like Redis, it’s possible to implement such features on a global website with hundreds of thousands of simultaneous collaborative users. This approach enables users to interact seamlessly and synchronously, fostering a sense of connection and community in a digital space.
Alternatively, although a WebRTC implementation might be more complex, it has better scalability and lower latency. This makes WebRTC a perfect choice for high-throughput real-time applications
Acknowledgements
Thanks to Leon Drygala(opens in a new tab or window) and Fu Xiu Heng(opens in a new tab or window) for their work on this feature and to Josh Leeb and Neng Yang for conducting their tech review.