connect API
Apply Canva Brand templates with the Autofill API
How to identify and consistently apply Canva Brand Templates using the Brand template API and Autofill API.
Protecting brand integrity means sometimes defending a brand fiercely, and always applying the brand design consistently. If your project or web app can’t provide your customers a consistent way to find and apply brand templates, you risk spending time catching up on repeated request for a brand template feature. Canva Connect API provides the solution, giving your customers consistency in how they:
- Access and apply Canva Brand Templates.
- Automatically fill out new designs from templates.
This guide shows you how to build an example integration using the Brand template and Autofill APIs to access Canva Brand Templates and apply them consistently to a design. These APIs let your web app apply a Canva Brand Template to a Canva design entirely within your integration. Your customers won’t need to use the Canva editor to edit their design manually.
You can try out the APIs right now:
- From the docs page (be aware this sends API requests to your Canva account's live data).
- Using the Canva Connect API Starter Kit, which provides a working e-commerce web app showcasing the API's features.
When you're ready to use the Autofill API for your own applications, see the Autofill guide. It explains how to create a Canva Brand Template and apply it to a new design automatically.
Before you begin
Before applying a brand template, you need:
- A Canva account: With multi-factor authentication enabled.
- An integration in your account: To connect your application to Canva, prepare for authorization, and configure API scopes.
- Autofill API access: When you've created your integration, register for access (under Scopes > Data autofill APIs, click the Register for access button).
- A Canva Brand Template: To create one, you need a Canva Teams account. A free trial is available(opens in a new tab or window).
- An access token: To create a token:
- Create an authorization URL to get an authorization code.
- Generate an access token using a request to the Authentication API.
- Tools:
- Text editor
- Command-line shell with the Node.js CLI(opens in a new tab or window) (version 18 or higher) installed.
When you have your access token ready, you can use it to test out the Brand template and Autofill APIs.
Access tokens have a limited lifespan. When your current token expires, use the refresh token to request a new access token.
Configure API scopes
Scopes let you specify what actions your integration can perform on behalf of the end user. To grant Brand template and Autofill APIs access to your integration, set the following scope permissions under the Scopes tab:
design:content:writedesign:content:readbrandtemplate:content:readbrandtemplate:meta:read.
Step 1. Collect and view brand templates
The example in the following steps uses JavaScript and the node command to make an API call, collect your Canva Brand Templates, and display the response returned by the Canva API in the console. The logged output can give you an idea of what parameters you can parse and display when building your integration.
To collect your Canva Brand Template and view the API response:
-
Create a new JavaScript file named
brandTemplate.jsand add the following.module.exports.init = function () {fetch("https://api.canva.com/rest/v1/brand-templates?dataset=non_empty", {method: "GET",headers: {"Authorization": "Bearer <Add your Access Token Here>",},}).then(async (response) => {const data = await response.json();console.log(data);}).catch(err => console.error(err));}JSUse the
dataset=non_emptyquery parameter to filter and return only Canva Brand Templates that have a dataset. -
Run the following
nodecommand to make your API request.node -e 'require("./brandTemplate.js").init()'SHELLThe API response returns a list of available Canva Brand Templates, as well as other important response parameters, as shown in the following example.
{continuation: '<token-value>',items: [{id: '<id-value>',title: 'Limited Presentation',view_url: 'https://www.canva.com/design/<id-value>/view',create_url: 'https://www.canva.com/design/<id-value>/remix',thumbnail: [Object],created_at: 1701760702,updated_at: 1715904777},JSON
If customers have more Canva Brand Templates than the response's pagination parameters can handle, the response returns a continuation token. Use this token in your integration as a query parameter to request the next set of results.
The Brand Template API returns the Canva Brand Template ID, which you need to apply templates consistently. The next step uses this ID to retrieve the information you need about each template so you can apply it to a design.
Step 2. Collect a brand template dataset
To collect information about a specific brand template, including the dataset for applying the template to a design:
-
Create a new JavaScript file named
getBrandTemplate.jsand add the following code.module.exports.init = function () {fetch("https://api.canva.com/rest/v1/brand-templates/<add your Canva Brand Template ID here>/dataset", {method: "GET",headers: {"Authorization": "Bearer <Add your access token here>",},}).then(async (response) => {const data = await response.json();console.log(data);}).catch(err => console.error(err));}JS -
Run the following
nodecommand to make the API request.node -e 'require("./getBrandTemplate.js").init()'SHELLA successful response returns the requested Canva Brand Template's dataset, including the data fields you can change when creating a new design from the template.
If you receive the following error when testing your web application, check your integration has the correct permissions to access the brand template.
{code: 'permission_denied',message: 'Not allowed to get brand template with ID <ID-value>'}JSON
Step 3. Apply the brand template using the Autofill API
To apply the brand template using the Autofill API:
-
Create a new file called
autofillBrand.jsand add the following code.module.exports.init = function () {fetch("https://api.canva.com/rest/v1/autofills", {method: "POST",headers: {"Authorization": "Bearer <Add your Access Token Here>","Content-Type": "application/json"},body: JSON.stringify({"brand_template_id": "<Add your Canva Brand Template ID here>","title": "string","data": {"title": {"type": "text","text": "Brand template autofill completed"}}}),}).then(async (response) => {const data = await response.json();console.log(data);}).catch(err => console.error(err));}JSThis request initiates an asynchronous design autofill job based on the included Canva Brand Template data and ID. If successful, it creates a new design based on the template.
-
Run the following
nodecommand to send thePOSTrequest and check for a response.node -e 'require("./autofillBrand.js").init()'SHELL{"job": {"id": "<design autofill job id value>","status": "in_progress"}}JSON
A successful response means the design autofill job has started and is in progress, as indicated by the status. In the next step, use the Autofill job ID (job.id) to check on the status of the new design.
Troubleshoot the asset ID
{"code": "invalid_field","message": "'asset_id' must not be null."}
If the response returns this error, your Canva Brand Template has an image data field, so you must supply a Canva asset ID in the Autofill API body section. You can use the Assets Canva API endpoint(opens in a new tab or window) to provide customers with the ability to upload their image assets. The Assets API can help you access and use uploaded media asset IDs when automatically filling designs from Canva Brand Templates.
Step 4. Query autofill job status
To check if a new design is successfully created from a Canva Brand Template, you can query the autofill job's status:
-
Create a new file named
queryAutofill.jsand add the following code.module.exports.init = function () {fetch("https://api.canva.com/rest/v1/autofills/<Add your autofill job id value here>", {method: "GET",headers: {"Authorization": "Bearer <Add your Access Token Here>",},}).then(async (response) => {const data = await response.json();console.log(util.inspect(data, { depth: null }));}) //util.inspect makes sure the console.log displays the response object in full..catch(err => console.error(err));}JS -
Run the following
nodecommand to query the autofill job.node -e 'require("./queryAutofill.js").init()'SHELL
Poll autofill job status
Polling the autofill job often, and parsing the response, provides useful information for your web app's user experience.
While the autofill job is running, the Get design autofill job API returns the following response.
{"job": {"id": "<autofill design job id>","status": "in_progress"}}
While the status is in_progress, you can provide customers with a loading state, then display a new message when the status changes to success. The following side-by-side example shows the queryAutofill.js response alongside a response from the same GET request directly on the Autofill API docs page.
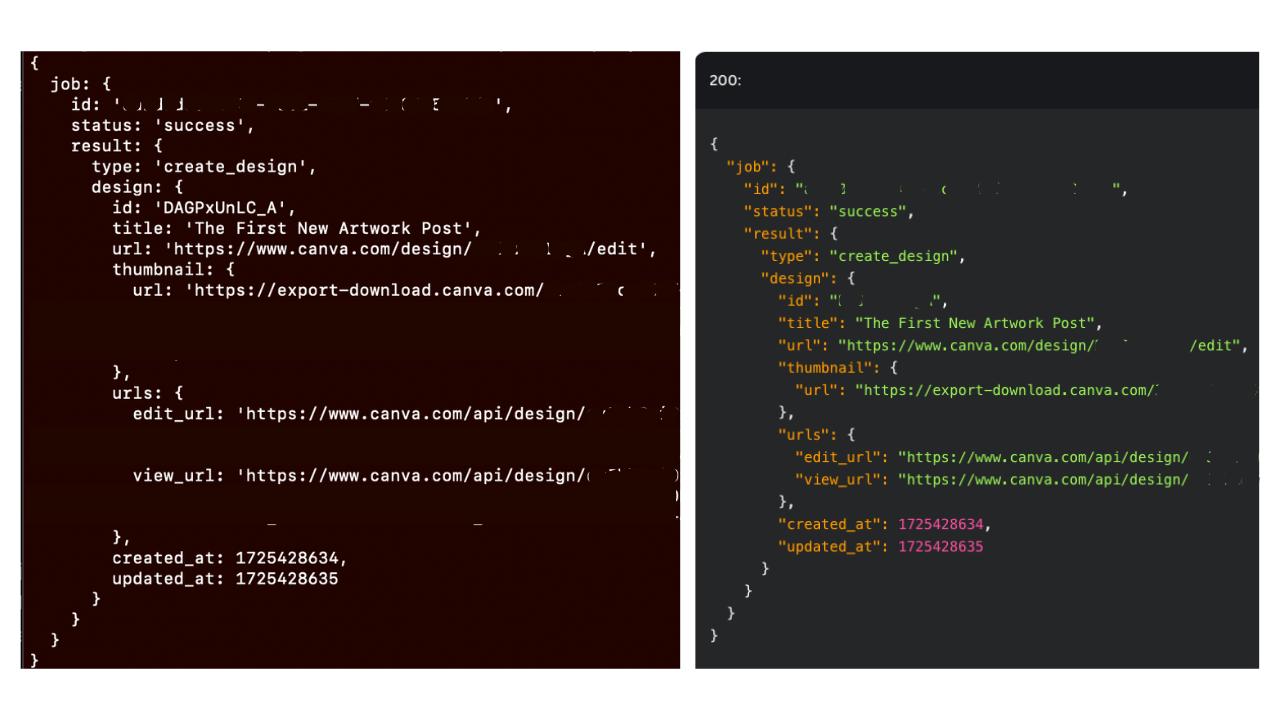
The successful response includes a link to view the design, which is the view_url. You can display this link in your integration to show users how the design looks.
Apply Canva Brand Templates for consistent designs
Using the Autofill API in your integration helps your customers apply their Canva Brand Templates consistently. They can view exactly what aspects of a design they're able to modify, and know the design follows their branding.
Remember, you can try out the Canva APIs in the Connect API documentation anytime, and the Connect API Starter Kit(opens in a new tab or window) is available for a complete demonstration of what you can build.
